Upgrading to Windows 10: A Seamless Transition for Your Data
Related Articles: Upgrading to Windows 10: A Seamless Transition for Your Data
Introduction
With great pleasure, we will explore the intriguing topic related to Upgrading to Windows 10: A Seamless Transition for Your Data. Let’s weave interesting information and offer fresh perspectives to the readers.
Table of Content
Upgrading to Windows 10: A Seamless Transition for Your Data
Upgrading to Windows 10 from a previous version can be a daunting task, especially when considering the potential loss of valuable data. However, with careful planning and execution, the process can be smooth and efficient, ensuring the preservation of your files, settings, and applications. This article will provide a comprehensive guide on upgrading to Windows 10 without data loss, addressing common concerns and offering practical solutions.
Understanding the Upgrade Process:
The core of a successful upgrade lies in understanding the different methods available and their implications. Primarily, there are two main approaches:
-
In-Place Upgrade: This method involves installing Windows 10 directly over your existing operating system. It retains your personal files, settings, and applications, essentially performing a "refresh" rather than a clean install.
-
Clean Install: This method involves formatting your hard drive and installing Windows 10 from scratch. While this offers a fresh start, it necessitates a complete backup of your data and subsequent restoration after the installation.
Choosing the Right Approach:
The choice between an in-place upgrade and a clean install depends on your specific needs and circumstances.
-
In-place upgrade: This method is suitable for users who want to retain their existing data and settings. It’s a simpler and faster process, ideal for users who are familiar with their current configuration and don’t require a fresh start.
-
Clean install: This method is recommended for users who want to start with a clean slate or have encountered significant system issues. It can resolve performance problems, remove unwanted programs, and ensure a fresh operating system environment.
Preparing for the Upgrade:
Regardless of the chosen method, thorough preparation is crucial for a successful upgrade.
-
Backup Your Data: Before any upgrade, creating a comprehensive backup of your essential data is paramount. This includes documents, photos, music, videos, and any other important files. Utilize external hard drives, cloud storage services, or dedicated backup software to ensure data safety.
-
Check System Compatibility: Confirm that your computer meets the minimum system requirements for Windows 10. This includes checking the processor, RAM, hard drive space, and graphics card specifications.
-
Update Drivers: Ensure that all your hardware drivers are up-to-date. Outdated drivers can cause compatibility issues during the upgrade.
-
Disable Antivirus Software: Temporary disable your antivirus software during the upgrade process. Antivirus programs can interfere with the installation process, potentially causing errors.
Performing the In-Place Upgrade:
-
Download the Windows 10 Upgrade Tool: Visit the official Microsoft website and download the Windows 10 Upgrade Tool. This tool will guide you through the entire upgrade process.
-
Run the Tool: Execute the downloaded tool and follow the on-screen instructions. The tool will check your system compatibility, download the necessary files, and initiate the upgrade process.
-
Accept the License Agreement: Review and accept the Windows 10 license agreement.
-
Choose "Keep Personal Files and Apps": This option ensures that your data, settings, and applications are retained during the upgrade.
-
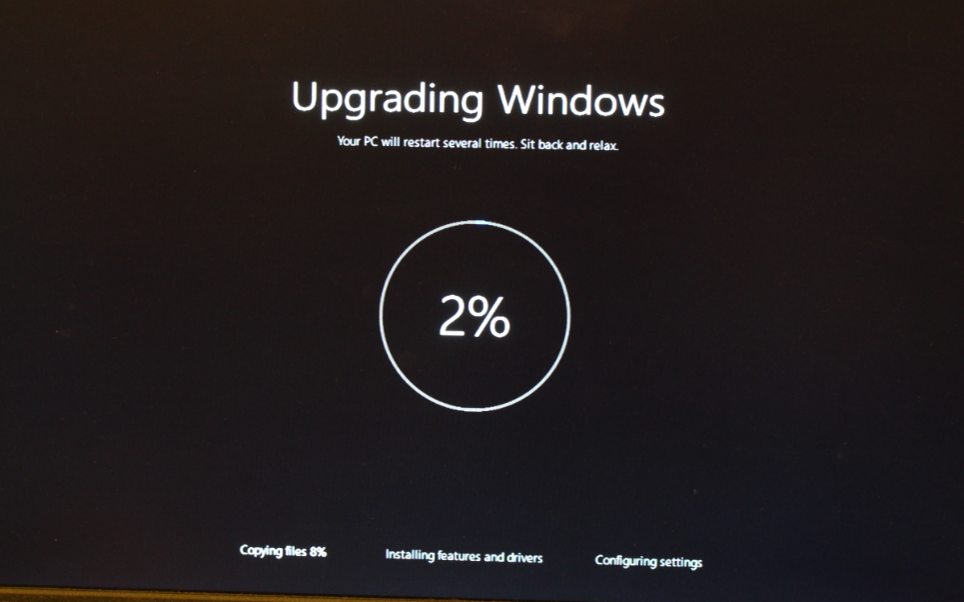
Complete the Installation: Allow the upgrade process to complete. This may take several hours, depending on your system’s speed and the amount of data being transferred.
Performing a Clean Install:
-
Create a Bootable USB Drive: Download the Windows 10 ISO file from the Microsoft website. Use a tool like Rufus or the Windows USB/DVD Download Tool to create a bootable USB drive.
-
Backup Your Data: Ensure you have a complete backup of your data before proceeding.
-
Boot from the USB Drive: Change the boot order in your BIOS settings to prioritize the USB drive.
-
Format the Hard Drive: During the Windows 10 installation process, choose the "Custom" installation option and format your hard drive.
-
Install Windows 10: Follow the on-screen instructions to complete the Windows 10 installation.
-
Restore Your Data: After the installation, restore your backed-up data to your newly installed Windows 10 system.
Troubleshooting Common Issues:
During the upgrade process, you may encounter various issues. Here are some common problems and their solutions:
-
Error Codes: Refer to the Microsoft support website for specific error code solutions.
-
Upgrade Process Halting: Restart your computer and try the upgrade again. If the issue persists, consider using the clean install method.
-
Missing Drivers: After the upgrade, download and install any missing drivers for your hardware components.
-
Application Compatibility: Some applications may not be compatible with Windows 10. Check for updated versions or find suitable alternatives.
FAQs:
-
Q: Will I lose my data if I upgrade to Windows 10?
A: No, you should not lose your data if you perform an in-place upgrade. However, it’s always recommended to have a backup in case of unexpected issues.
-
Q: Can I upgrade from Windows 7 or 8.1 to Windows 10 for free?
A: The free upgrade offer for Windows 10 expired in 2016. Currently, you need to purchase a Windows 10 license to upgrade.
-
Q: How long does the upgrade process take?
A: The upgrade time varies depending on your system’s speed, the amount of data being transferred, and the chosen upgrade method. It can take anywhere from 30 minutes to several hours.
-
Q: Can I downgrade back to my previous Windows version after upgrading?
A: Downgrading is possible within a specific time frame after upgrading. However, it requires specific steps and may not be available for all users.
Tips for a Seamless Upgrade:
-
Prioritize System Maintenance: Ensure your system is clean and optimized before the upgrade. Run a disk cleanup, defragment your hard drive, and update your system to the latest version.
-
Check for Compatibility: Verify that your hardware and software are compatible with Windows 10 before proceeding with the upgrade.
-
Create Multiple Backups: Consider creating multiple backups of your data using different methods to ensure data security.
-
Research and Prepare: Familiarize yourself with the upgrade process and potential issues beforehand. This will help you anticipate and address any challenges during the upgrade.
Conclusion:
Upgrading to Windows 10 without losing data is achievable with careful planning and execution. By understanding the different upgrade methods, preparing your system, and addressing potential issues proactively, you can ensure a seamless transition for your data, settings, and applications. Remember that a comprehensive backup is always essential, regardless of the chosen upgrade method, providing peace of mind and data security throughout the process.


Closure
Thus, we hope this article has provided valuable insights into Upgrading to Windows 10: A Seamless Transition for Your Data. We hope you find this article informative and beneficial. See you in our next article!