Unveiling the Power of DNS Settings in Windows 10: A Comprehensive Guide
Related Articles: Unveiling the Power of DNS Settings in Windows 10: A Comprehensive Guide
Introduction
With enthusiasm, let’s navigate through the intriguing topic related to Unveiling the Power of DNS Settings in Windows 10: A Comprehensive Guide. Let’s weave interesting information and offer fresh perspectives to the readers.
Table of Content
Unveiling the Power of DNS Settings in Windows 10: A Comprehensive Guide
In the digital landscape, where seamless access to online resources is paramount, a critical component often overlooked is the Domain Name System (DNS). This intricate network infrastructure acts as a translator, converting human-readable domain names (like "google.com") into numerical IP addresses that computers understand. Windows 10, being a ubiquitous operating system, provides users with the ability to manage their DNS settings, thereby influencing how their devices interact with the internet.
Understanding DNS: The Foundation of Online Communication
Imagine a vast library with countless books, each with a unique identifier. However, these identifiers are complex and difficult to remember. To access specific books, you rely on a librarian who knows the location of each book and can retrieve it based on its title. This librarian is analogous to a DNS server.
When you type "google.com" into your browser, your computer sends a request to a DNS server. The server, armed with a massive database of domain names and their corresponding IP addresses, translates "google.com" into the numerical address of Google’s servers. This address allows your computer to establish a connection and retrieve the desired web page.
The Significance of DNS Settings in Windows 10
DNS settings in Windows 10 play a crucial role in shaping your online experience. These settings determine which DNS servers your computer uses to resolve domain names. By default, Windows 10 typically utilizes DNS servers provided by your internet service provider (ISP). While these servers generally function well, there are compelling reasons to consider customizing your DNS settings:
-
Enhanced Speed and Performance: Public DNS servers, such as those offered by Google or Cloudflare, are known for their speed and reliability. By using these servers, you can experience faster website loading times and improved overall browsing performance.
-
Improved Security: Malicious actors can exploit vulnerabilities in DNS servers to redirect users to fraudulent websites. Choosing a reputable DNS provider with robust security measures can help mitigate these risks.
-
Content Filtering and Parental Controls: Some DNS providers offer content filtering capabilities, allowing you to block access to certain websites or content types. This can be particularly useful for parents who want to restrict their children’s online access.
-
Privacy Protection: Certain DNS providers prioritize user privacy by not logging your browsing history or other personal information.
Navigating DNS Settings in Windows 10: A Step-by-Step Guide
Modifying your DNS settings in Windows 10 is a straightforward process:
-
Accessing Network Settings: Open the "Settings" app by pressing the Windows key + I. Navigate to "Network & Internet" and select "Ethernet" or "Wi-Fi," depending on your connection type.
-
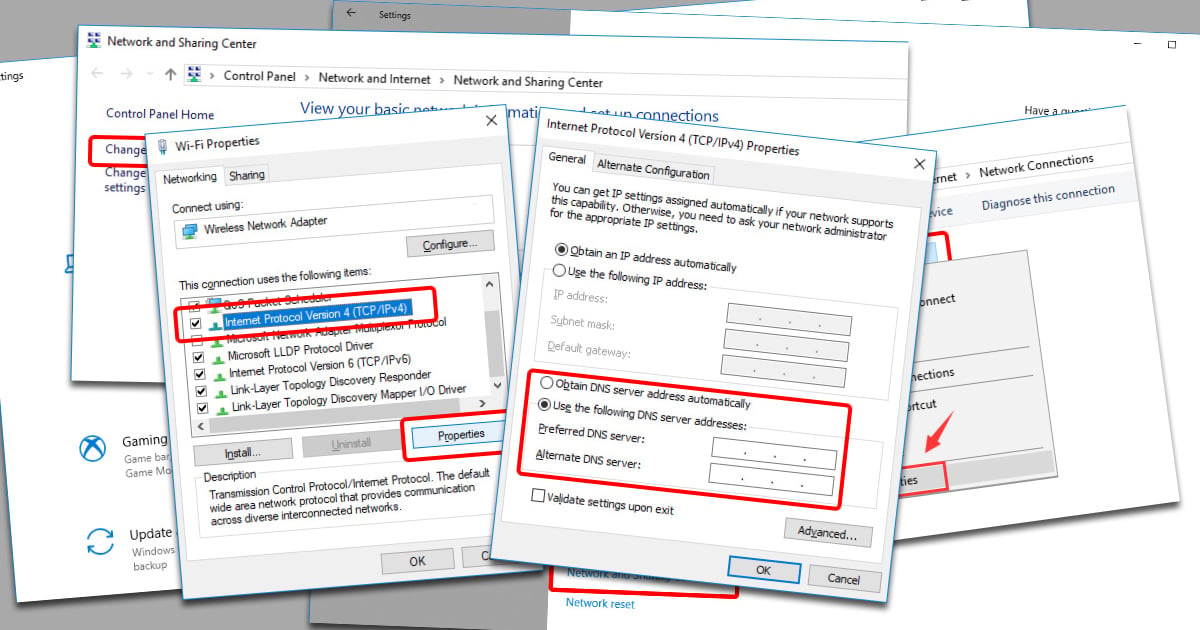
Accessing Network Properties: Click on the name of your current network connection. This will open a new window with detailed network information.
-
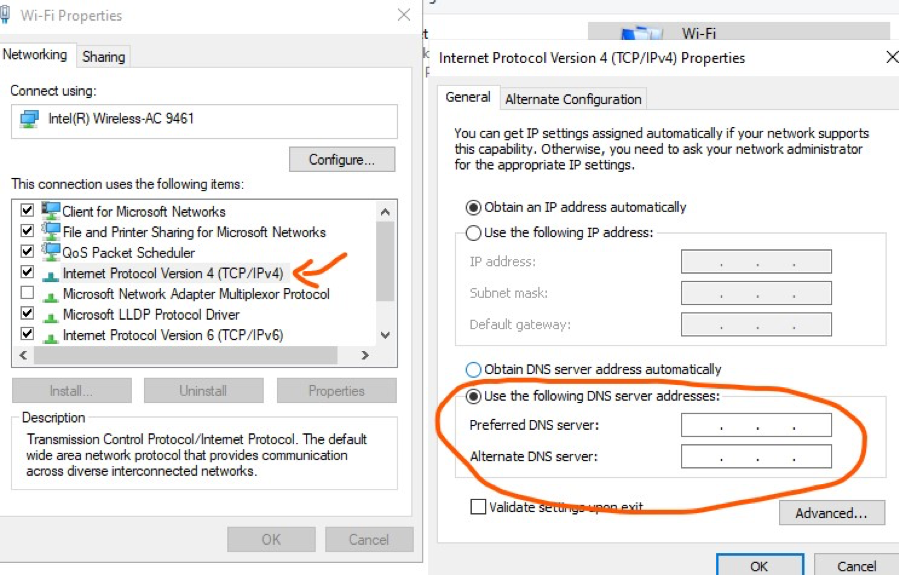
Modifying DNS Settings: Click on "Change adapter options" located in the right pane of the window. This will open the "Network Connections" window. Right-click on your network connection and select "Properties."
-
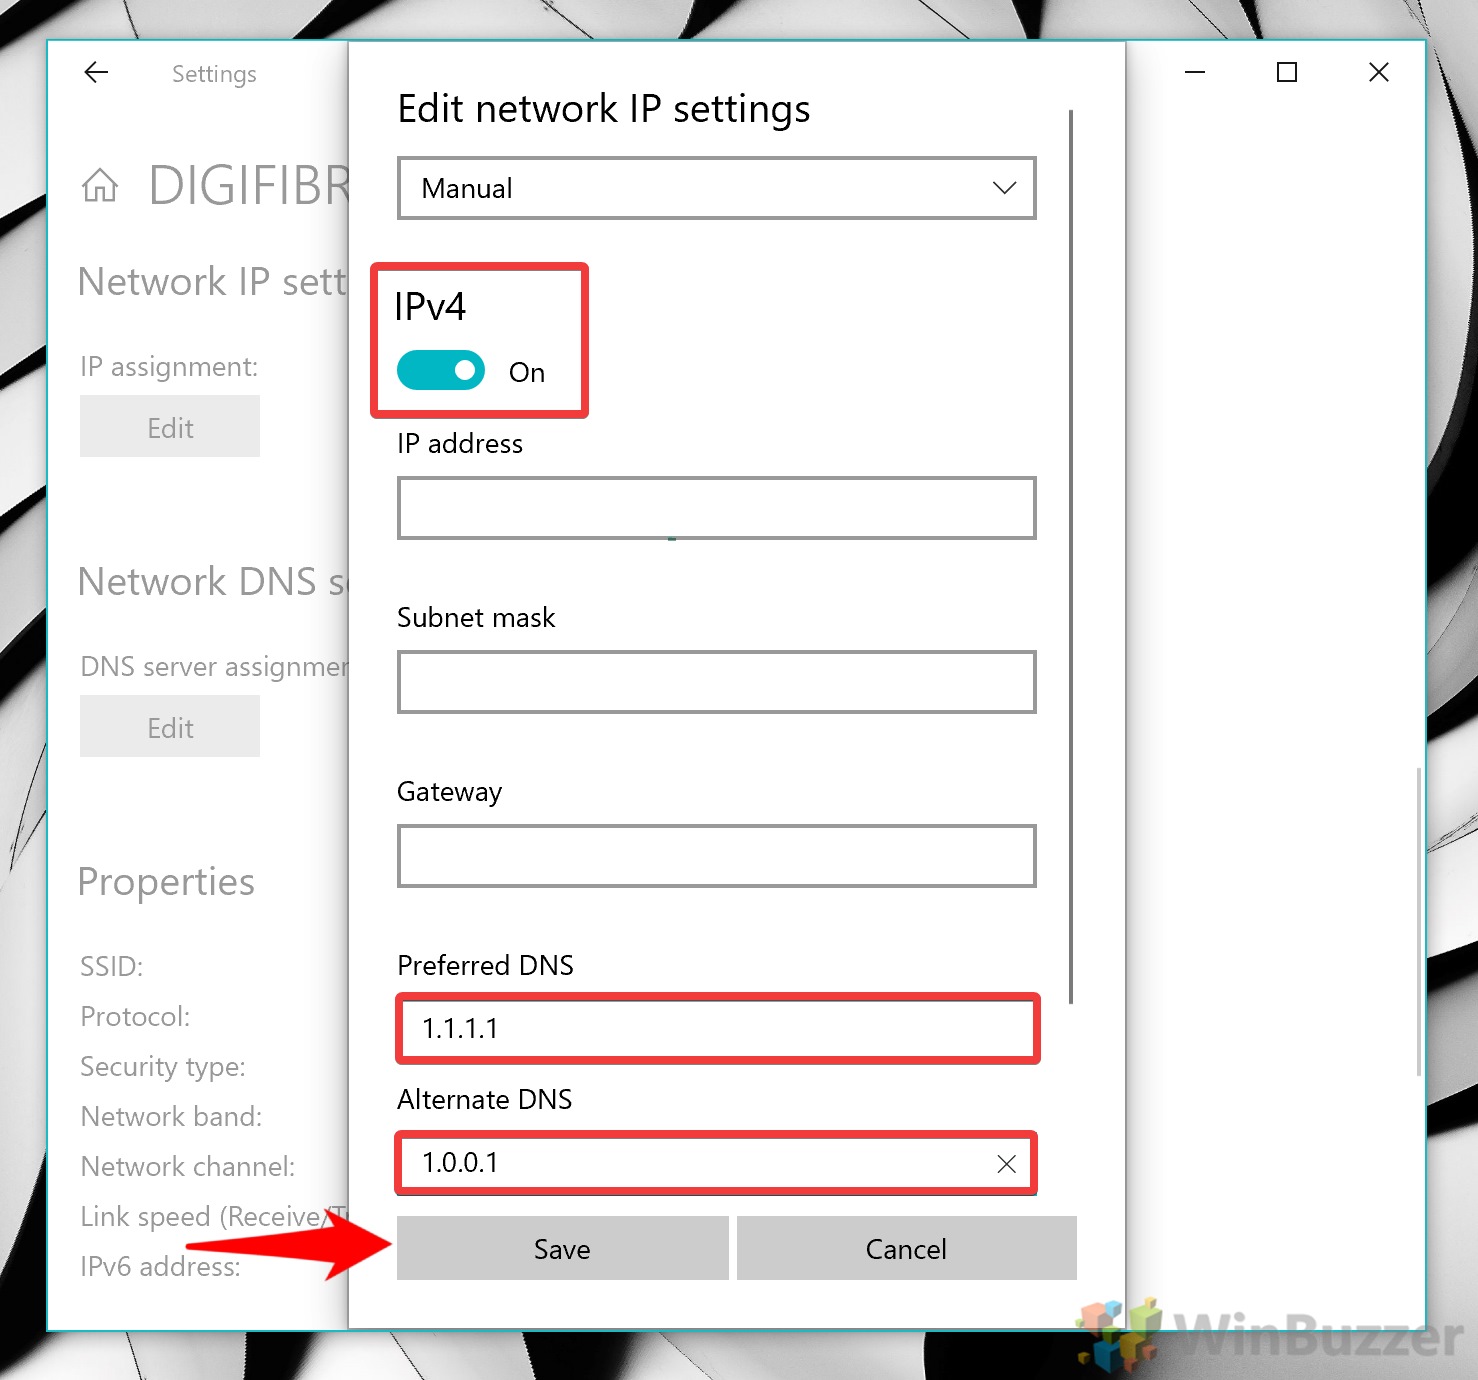
Selecting Internet Protocol Version 4 (IPv4): In the "Networking" tab, locate "Internet Protocol Version 4 (TCP/IPv4)" and double-click on it.
-
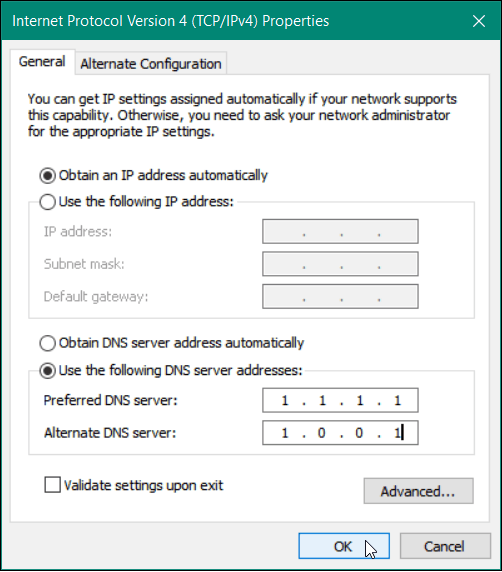
Configuring DNS Servers: The "Internet Protocol Version 4 (TCP/IPv4) Properties" window will appear. Select the "Use the following DNS server addresses" option.
-
Entering Preferred and Alternate DNS Server Addresses: In the "Preferred DNS server" field, enter the IP address of your chosen DNS server. In the "Alternate DNS server" field, enter the IP address of a secondary DNS server. This secondary server acts as a backup if the primary server becomes unavailable.
-
Saving Changes: Click "OK" to save the changes.
Frequently Asked Questions about DNS Settings in Windows 10
Q: What are the best DNS servers to use?
A: There are numerous reputable DNS servers available. Some popular options include:
- Google Public DNS: 8.8.8.8 and 8.8.4.4
- Cloudflare DNS: 1.1.1.1 and 1.0.0.1
- OpenDNS: 208.67.222.222 and 208.67.220.220
- Quad9: 9.9.9.9 and 149.112.112.112
The optimal DNS server for you will depend on your specific needs and priorities, such as speed, security, and privacy.
Q: Can I use multiple DNS servers simultaneously?
A: No, you can only configure one preferred and one alternate DNS server at a time. However, you can switch between different DNS servers by modifying your settings.
Q: Will changing DNS settings affect my internet connection?
A: Changing your DNS settings should not affect your internet connection. However, if you enter incorrect DNS server addresses, you may experience connectivity issues.
Q: How do I revert to default DNS settings?
A: To revert to the default DNS settings provided by your ISP, simply select the "Obtain DNS server address automatically" option in the "Internet Protocol Version 4 (TCP/IPv4) Properties" window.
Tips for Optimizing DNS Settings in Windows 10
-
Test DNS Servers: Before making any permanent changes, consider testing different DNS servers to determine which one offers the best performance for your specific location and internet connection.
-
Use a DNS Benchmarking Tool: Several online tools can benchmark DNS servers and provide insights into their speed and reliability.
-
Consider a DNS Resolver: DNS resolvers, such as those provided by Cloudflare and Quad9, can enhance security and privacy by adding an extra layer of protection between your computer and the DNS server.
-
Monitor DNS Settings: Regularly check your DNS settings to ensure they remain accurate and up-to-date.
Conclusion: The Power of DNS Settings in Windows 10
By understanding and customizing DNS settings in Windows 10, users can gain control over their online experience, enjoying enhanced speed, improved security, and greater privacy. While using default DNS servers provided by ISPs is often sufficient, exploring alternative options can unlock significant benefits. By carefully selecting and configuring DNS settings, users can optimize their internet connection, ensuring a smoother, more secure, and more personalized online journey.

![How to Change DNS Settings in Windows 10 [Guide] Beebom](https://beebom.com/wp-content/uploads/2021/01/How-to-Change-DNS4.jpg)

:max_bytes(150000):strip_icc()/DNSServers-891f522f2bc2469088df0a11dd687611.jpg)
Closure
Thus, we hope this article has provided valuable insights into Unveiling the Power of DNS Settings in Windows 10: A Comprehensive Guide. We appreciate your attention to our article. See you in our next article!