The Role of the Swap File in Windows 10 and When to Disable It
Related Articles: The Role of the Swap File in Windows 10 and When to Disable It
Introduction
In this auspicious occasion, we are delighted to delve into the intriguing topic related to The Role of the Swap File in Windows 10 and When to Disable It. Let’s weave interesting information and offer fresh perspectives to the readers.
Table of Content
- 1 Related Articles: The Role of the Swap File in Windows 10 and When to Disable It
- 2 Introduction
- 3 The Role of the Swap File in Windows 10 and When to Disable It
- 3.1 Understanding the Swap File’s Functionality
- 3.2 Why Disable the Swap File?
- 3.3 Steps to Disable the Swap File in Windows 10
- 3.4 Frequently Asked Questions (FAQs)
- 3.5 Tips for Disabling the Swap File
- 3.6 Conclusion
- 4 Closure
The Role of the Swap File in Windows 10 and When to Disable It

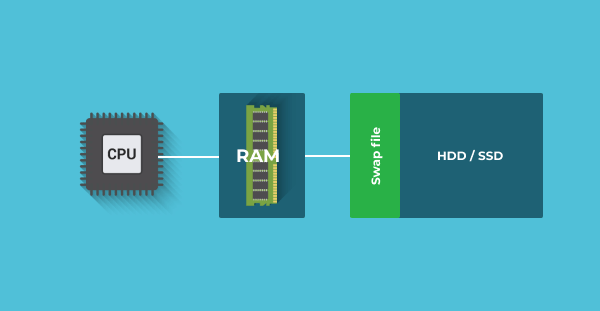
Windows 10, like many operating systems, utilizes a virtual memory mechanism known as the swap file. This file, located on your hard drive, acts as an extension of your physical RAM, enabling the system to run programs and processes that exceed the available physical memory. This process, known as "swapping," involves moving data from the RAM to the swap file when physical memory is limited. While this mechanism is generally beneficial, there are scenarios where disabling the swap file can be advantageous, particularly for users with ample RAM and specific performance needs.
Understanding the Swap File’s Functionality
The swap file, also referred to as the "paging file," plays a crucial role in Windows 10’s memory management. When the system runs out of physical RAM, it utilizes the swap file to temporarily store data that is not actively being used. This allows the system to continue running programs and processes without encountering memory errors.
Here’s how the swap file operates:
- Data Transfer: When the system needs more memory, it moves inactive data from the RAM to the swap file.
- Data Retrieval: When the system requires access to data previously stored in the swap file, it retrieves it back into the RAM.
- Dynamic Allocation: The swap file is dynamically allocated, meaning its size adjusts based on system needs. This ensures that sufficient space is available for swapping data without consuming excessive disk space.
Benefits of the Swap File:
- Enhanced System Stability: The swap file prevents memory-related errors and crashes, ensuring smoother system operation.
- Program Compatibility: Many programs require a certain amount of memory to function correctly. The swap file allows these programs to run even if the available RAM is limited.
- Improved Performance in Limited Memory Scenarios: In cases where physical RAM is scarce, the swap file helps to mitigate performance degradation by providing a temporary storage space for data.
Why Disable the Swap File?
While the swap file is generally beneficial, there are scenarios where disabling it can be advantageous:
- Abundant RAM: For users with ample RAM (8GB or more), the swap file becomes less critical, as the system can typically handle most tasks within the available physical memory. Disabling the swap file in such cases can potentially improve performance by eliminating the overhead associated with disk access for swapping.
- Solid State Drives (SSDs): SSDs have significantly faster read/write speeds compared to traditional hard disk drives (HDDs). However, excessive disk access, even on SSDs, can still impact performance. Disabling the swap file can reduce disk access and potentially improve system responsiveness, particularly during intensive tasks.
- Specific Performance Needs: Users engaged in highly demanding tasks, such as video editing, gaming, or 3D modeling, may experience performance improvements by disabling the swap file, especially if they have sufficient RAM.
Potential Drawbacks of Disabling the Swap File:
- System Instability: If your system runs out of RAM, disabling the swap file can lead to system crashes or errors as the operating system lacks a temporary storage space for data.
- Program Compatibility Issues: Some programs may require a certain amount of virtual memory to function correctly. Disabling the swap file could cause these programs to malfunction or fail to start.
- Reduced Performance in Low Memory Scenarios: If your system has limited RAM and the swap file is disabled, performance may be significantly impacted, especially during memory-intensive tasks.
Steps to Disable the Swap File in Windows 10
Disabling the swap file in Windows 10 is a straightforward process:
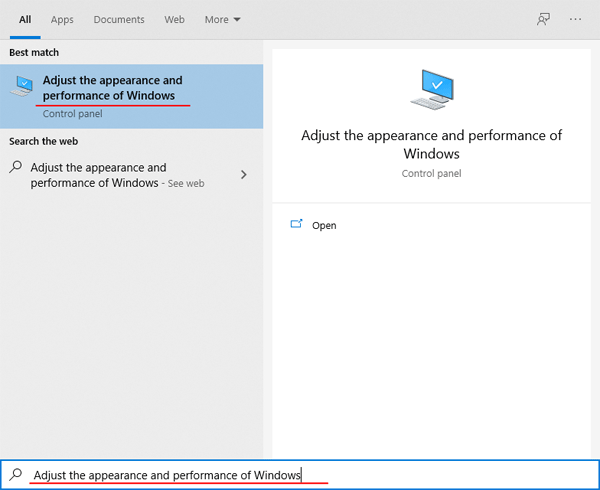
- Open System Properties: Press Windows key + R, type sysdm.cpl, and press Enter.
- Navigate to Advanced Settings: Click on the Advanced tab, then click on Settings under the Performance section.
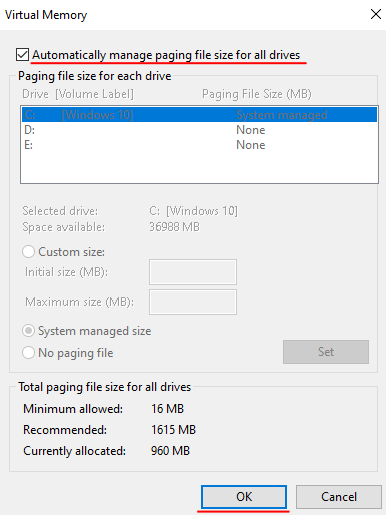
- Select Virtual Memory: In the Performance Options window, choose the Advanced tab. Then, under the Virtual memory section, click Change.
- Disable the Swap File: Uncheck the Automatically manage paging file size for all drives option. Select the Custom Size option, set both the Initial size (MB) and Maximum size (MB) to 0.
- Apply Changes: Click Set, then OK to apply the changes and close all windows.
Important Note: It is strongly recommended to restart your computer after disabling the swap file to ensure the changes take effect properly.
Frequently Asked Questions (FAQs)
Q: Is it safe to disable the swap file?
A: Disabling the swap file can be safe if you have sufficient RAM and understand the potential drawbacks. However, if you experience system crashes or program compatibility issues, you should re-enable the swap file.
Q: What are the signs that I need to re-enable the swap file?
A: Signs that you might need to re-enable the swap file include frequent system crashes, slow performance, or program errors.
Q: Can I disable the swap file for specific drives?
A: No, you cannot disable the swap file for specific drives. You can only disable it for the entire system.
Q: How do I re-enable the swap file?
A: To re-enable the swap file, follow the same steps as disabling it, but instead of setting the size to 0, select System managed size or choose a custom size that suits your needs.
Q: Will disabling the swap file improve gaming performance?
A: Disabling the swap file might improve gaming performance in some cases, especially if you have ample RAM and a fast SSD. However, it’s not a guaranteed solution and can even negatively impact performance in certain scenarios.
Tips for Disabling the Swap File
- Backup Your System: Before disabling the swap file, it’s always recommended to create a system backup to ensure you can restore your system to its previous state if necessary.
- Monitor System Performance: After disabling the swap file, monitor your system’s performance for any changes or issues. If you experience any problems, consider re-enabling the swap file.
- Experiment with Custom Swap File Sizes: If you are unsure about disabling the swap file completely, you can experiment with setting a custom size for the swap file. This allows you to control the amount of disk space allocated for virtual memory.
Conclusion
Disabling the swap file in Windows 10 can be beneficial in specific situations, particularly for users with ample RAM and who prioritize performance. However, it is essential to understand the potential drawbacks and proceed cautiously. If you experience any issues after disabling the swap file, it is recommended to re-enable it to ensure system stability and program compatibility. Remember to carefully assess your system’s needs and make informed decisions regarding the swap file.


Closure
Thus, we hope this article has provided valuable insights into The Role of the Swap File in Windows 10 and When to Disable It. We hope you find this article informative and beneficial. See you in our next article!