The Power of Deployment Image Servicing and Management (DISM) in Windows 10
Related Articles: The Power of Deployment Image Servicing and Management (DISM) in Windows 10
Introduction
In this auspicious occasion, we are delighted to delve into the intriguing topic related to The Power of Deployment Image Servicing and Management (DISM) in Windows 10. Let’s weave interesting information and offer fresh perspectives to the readers.
Table of Content
The Power of Deployment Image Servicing and Management (DISM) in Windows 10
Windows 10, with its continuous updates and feature enhancements, relies heavily on a robust system for managing and maintaining its image integrity. This is where the Deployment Image Servicing and Management (DISM) command-line tool comes into play. DISM is a powerful tool that allows administrators and users to service, repair, and customize Windows 10 images. It provides a comprehensive suite of functionalities to address various needs, ranging from repairing corrupted system files to preparing Windows images for deployment.
Understanding the Fundamentals of DISM
At its core, DISM operates on Windows images, which are essentially snapshots of the operating system’s files and settings. These images can be stored locally or on a network share, making them readily accessible for manipulation. DISM leverages the Windows Imaging (WIM) format, a compressed archive that encapsulates the entire operating system.
Key Capabilities of DISM
DISM offers a wide range of capabilities, making it an indispensable tool for managing Windows 10 installations:
-
Image Servicing: DISM enables the addition, removal, or modification of components within a Windows image. This includes installing updates, language packs, drivers, and other features. It also allows for the removal of unwanted components, streamlining the image and minimizing its footprint.
-
Repair and Recovery: DISM plays a crucial role in repairing corrupted Windows installations. It can scan the system for errors, identify missing or damaged files, and attempt to restore them from a source image or the Windows Update server. This capability is particularly useful when encountering system instability or errors that prevent the operating system from booting properly.
-
Image Optimization: DISM provides options for optimizing Windows images by removing unnecessary files and components. This can reduce the image size, making it easier to deploy and manage. It also helps in reducing the overall disk space required for the installation.
-
Deployment Automation: DISM can be integrated into automated deployment scenarios, enabling the creation of customized Windows images that meet specific organizational needs. These images can be pre-configured with specific applications, settings, and drivers, streamlining the deployment process and ensuring consistency across multiple machines.
Practical Applications of DISM
The versatility of DISM makes it a valuable tool for various scenarios:
-
Troubleshooting System Errors: When encountering system errors, DISM can be used to diagnose the issue and repair corrupted system files. It can scan the system for missing or damaged components and attempt to restore them from a source image or the Windows Update server.
-
Preparing Windows Images for Deployment: DISM is essential for preparing Windows images for deployment. It allows administrators to customize the image by adding or removing features, installing drivers, and configuring specific settings. This ensures that all deployed systems meet the organization’s requirements.
-
Managing Windows Updates: DISM can be used to manage Windows updates, including installing, removing, or repairing them. This is particularly useful for organizations that need to control the update process and ensure that all systems are running the same version of Windows.
-
Creating Custom Windows Images: DISM allows for the creation of custom Windows images tailored to specific needs. This can include adding specific applications, drivers, or settings that are not included in the default Windows image.
Using the DISM Command-Line Tool
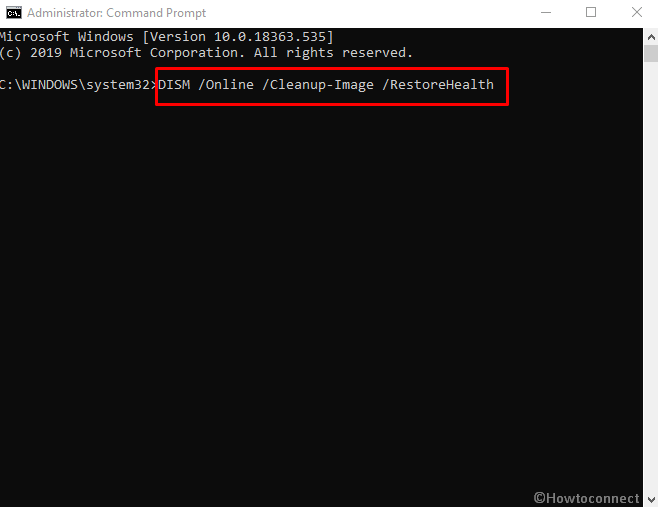
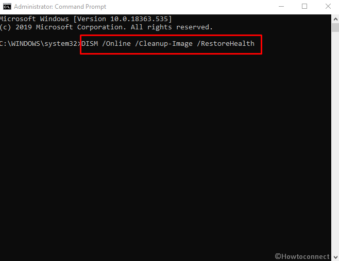
DISM is a command-line tool, which means it is accessed through the command prompt or PowerShell. The basic syntax for using DISM is:
DISM /Online /Cleanup-Image /RestoreHealthThis command will scan the current Windows installation for errors and attempt to repair them using a source image or the Windows Update server.
Exploring DISM Command Options
DISM offers a wide range of commands and options, enabling granular control over image management and repair. Some common commands and options include:
-
/Online: Specifies that the command should be executed on the current operating system. -
/Image: Specifies a path to a Windows image file. -
/Cleanup-Image: Performs various cleanup operations on the image, such as removing temporary files or unnecessary components. -
/RestoreHealth: Attempts to repair corrupted system files. -
/Add-Package: Adds a feature or package to the image. -
/Remove-Package: Removes a feature or package from the image. -
/Apply-Diskimage: Applies a disk image to a specific partition. -
/Get-WimInfo: Displays information about a WIM image file.
Understanding DISM Log Files
DISM generates log files that provide detailed information about the actions performed and any errors encountered. These log files can be helpful in troubleshooting issues and understanding the results of DISM commands. The log files are located in the following directories:
- %SystemRoot%LogsDISMDISM.log
- %SystemRoot%LogsCBSCBS.log
Frequently Asked Questions (FAQs)
Q1: What are the benefits of using DISM?
A: DISM offers several benefits, including:
- Repairing corrupted system files: DISM can fix various issues that may prevent Windows from functioning properly.
- Customizing Windows images: DISM allows for tailored images that meet specific organizational needs.
- Streamlining deployment: DISM simplifies the deployment process by creating pre-configured images.
- Managing Windows updates: DISM enables controlled management of updates, ensuring consistency across systems.
Q2: How do I use DISM to repair a corrupted Windows installation?
A: To repair a corrupted Windows installation, use the following command:
DISM /Online /Cleanup-Image /RestoreHealthThis command will scan the system for errors and attempt to repair them using a source image or the Windows Update server.
Q3: How do I use DISM to create a custom Windows image?
A: To create a custom Windows image, use the following steps:
-
Mount the Windows image: Use the
DISM /Mount-Imagecommand to mount the image file. -
Add or remove features: Use the
DISM /Add-PackageandDISM /Remove-Packagecommands to add or remove features from the image. -
Apply changes: Use the
DISM /Commit-Imagecommand to apply the changes to the image file. -
Unmount the image: Use the
DISM /Unmount-Imagecommand to unmount the image file.
Q4: How do I use DISM to manage Windows updates?
A: To manage Windows updates using DISM, use the following commands:
-
Install updates:
DISM /Online /Cleanup-Image /RestoreHealth -
Remove updates:
DISM /Online /Remove-Package /PackageName:<Package Name> -
Repair updates:
DISM /Online /Cleanup-Image /RestoreHealth
Q5: Where can I find more information about DISM?
A: You can find comprehensive documentation and resources on the Microsoft website, including the official DISM command-line reference and troubleshooting guides.
Tips for Using DISM Effectively
- Back up your data: Before using DISM to repair or modify a Windows image, it is essential to back up your data to prevent data loss.
- Use a source image: If possible, use a source image to provide DISM with the necessary files to repair corrupted system files.
- Check the log files: Review the DISM log files for detailed information about the actions performed and any errors encountered.
- Use the DISM command-line reference: Refer to the official DISM command-line reference for detailed information about each command and option.
- Seek support: If you encounter difficulties, seek support from Microsoft or other reputable resources.
Conclusion
DISM is a powerful tool for managing and maintaining Windows 10 images. It provides a wide range of capabilities, from repairing corrupted system files to creating custom images for deployment. By understanding the fundamentals of DISM and its various commands, administrators and users can leverage its capabilities to ensure the stability, security, and customization of their Windows 10 installations. With its comprehensive features and flexibility, DISM empowers users to effectively manage and optimize their Windows 10 environments, contributing to a more efficient and reliable computing experience.


![Cómo usar DISM en Windows 10 [GUÍA COMPLETA] - Mundowin](https://i0.wp.com/mundowin.com/wp-content/uploads/2019/06/How-to-Use-DISM-Deployment-Image-Servicing-Management-in-Windows-10.png?w=1200u0026is-pending-load=1#038;ssl=1)
Closure
Thus, we hope this article has provided valuable insights into The Power of Deployment Image Servicing and Management (DISM) in Windows 10. We appreciate your attention to our article. See you in our next article!