Securing Your Privacy and Data: A Guide to Thoroughly Erasing Windows 11 Before Selling Your PC
Related Articles: Securing Your Privacy and Data: A Guide to Thoroughly Erasing Windows 11 Before Selling Your PC
Introduction
In this auspicious occasion, we are delighted to delve into the intriguing topic related to Securing Your Privacy and Data: A Guide to Thoroughly Erasing Windows 11 Before Selling Your PC. Let’s weave interesting information and offer fresh perspectives to the readers.
Table of Content
Securing Your Privacy and Data: A Guide to Thoroughly Erasing Windows 11 Before Selling Your PC

Selling a used computer can be a convenient way to dispose of outdated technology and recoup some of your initial investment. However, neglecting to properly prepare your computer before selling it can leave your personal data vulnerable and potentially expose you to security risks. This guide provides a comprehensive approach to thoroughly erasing your Windows 11 PC, ensuring your privacy is protected and the new owner receives a clean slate.
The Importance of Erasing Your Windows 11 PC
When you sell a computer, you are essentially relinquishing control over the data it contains. If you do not erase your hard drive properly, the new owner could potentially access sensitive information such as:
- Personal Files: Documents, photos, videos, emails, and other files containing private information.
- Passwords and Login Credentials: Stored in web browsers, applications, and system settings.
- Financial Information: Bank account details, credit card numbers, and online payment information.
- Health Records: Medical information stored on your computer.
- Other Sensitive Data: Personal correspondence, tax documents, and any other information you consider confidential.
Leaving this data exposed not only compromises your privacy but also puts you at risk of identity theft, fraud, and other security threats.
Methods for Erasing Your Windows 11 PC
There are several methods for erasing your Windows 11 PC, each with varying levels of security and complexity.
1. Using the Windows Reset Feature:
This built-in tool provides a simple way to erase your computer’s hard drive and restore it to its factory settings.
-
Steps:
- Open the Settings app (Windows key + I).
- Navigate to System > Recovery.
- Click on Reset this PC.
- Choose the desired option:
- Keep my files: This option removes your personal files and settings but retains the operating system.
- Remove everything: This option completely erases your hard drive, including the operating system.
- Follow the on-screen instructions to complete the process.
2. Performing a Clean Install of Windows 11:
This involves installing a fresh copy of Windows 11 on your computer, effectively erasing all existing data.
-
Steps:
- Create a bootable USB drive with the Windows 11 installation media.
- Restart your computer and boot from the USB drive.
- Follow the on-screen instructions to install Windows 11.
- When prompted, choose the option to "Custom install Windows" and select the hard drive you want to format.
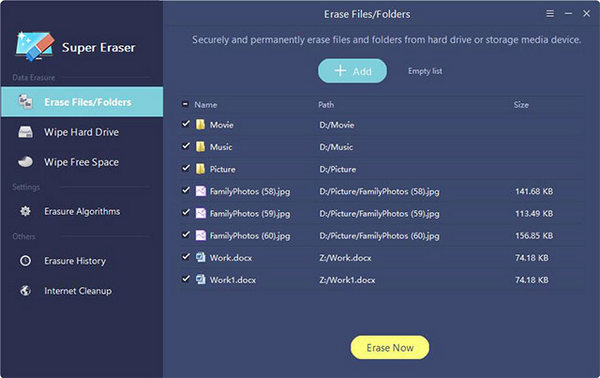
3. Using Third-Party Data Erasure Tools:
Specialized software like DBAN (Darik’s Boot and Nuke) or Eraser can perform more secure data erasure by overwriting the hard drive multiple times with random data.
-
Steps:
- Download and create a bootable USB drive with the chosen data erasure tool.
- Restart your computer and boot from the USB drive.
- Follow the on-screen instructions to erase the hard drive.
- Select the appropriate erasure method based on your security needs.
4. Securely Erasing the Hard Drive:
For the highest level of security, physically destroying the hard drive is recommended.
-
Steps:
- Remove the hard drive from your computer.
- Use a hard drive shredder or other physical destruction method to render the drive unusable.
Important Considerations When Erasing Your Windows 11 PC:
- Backup Your Important Data: Before erasing your computer, ensure you have backed up any essential files you want to keep.
- Understand the Different Erasure Methods: Each method offers varying levels of security. Choose the method that best suits your needs and risk tolerance.
- Verify Erasure: After erasing your hard drive, consider using a data recovery tool to confirm that the data is truly unrecoverable.
- Consider Data Encryption: If you are concerned about your data being accessed even after erasing, consider encrypting your hard drive before selling your computer.
FAQs: Erasing Your Windows 11 PC Before Selling
1. Can I simply delete my files and reset my PC?
While deleting files may seem sufficient, it is not secure enough. Deleted files can often be recovered using data recovery software. Resetting your PC may also leave traces of your data. It is essential to use a more robust erasure method.
2. Is it necessary to erase my entire hard drive?
If you are selling your computer, it is highly recommended to erase the entire hard drive. This ensures that no personal data remains accessible to the new owner.
3. What is the most secure method for erasing my Windows 11 PC?
The most secure method is to physically destroy the hard drive. However, this is not always feasible or practical. Using a specialized data erasure tool like DBAN or Eraser provides a high level of security and is a more accessible option.
4. How long does it take to erase a hard drive?
The time required to erase a hard drive depends on the size of the drive and the chosen erasure method. Basic methods like resetting your PC may take only a few minutes, while more secure methods like using a data erasure tool can take several hours.
5. What if I forget to back up my data?
If you have forgotten to back up your data, it is crucial to stop the erasure process immediately. Contact a data recovery specialist to attempt to recover your lost data.
Tips: Erasing Your Windows 11 PC Before Selling
- Remove All External Storage Devices: Disconnect any external hard drives, USB drives, or SD cards before erasing your computer.
- Deactivate Your Accounts: Log out of all online accounts, including social media, email, and cloud storage services.
- Remove Software Licenses: Deactivate any software licenses associated with your computer.
- Clean Your Computer: Physically clean your computer, removing any dust, dirt, or personal belongings.
- Keep Records of the Erasure: Document the erasure process, including the date, time, and method used.
Conclusion
Thoroughly erasing your Windows 11 PC before selling it is essential for protecting your privacy and preventing your personal data from falling into the wrong hands. By using a secure erasure method and following the recommended steps, you can ensure that your computer is completely wiped clean and ready for its new owner. Remember, protecting your data is crucial, and taking the time to erase your computer properly is an investment in your digital security.


![10 Tips to Protect Your Data [Infographic] SecurityHQ](https://www.securityhq.com/wp-content/uploads/2021/07/SecurityHQ-Infographic-Tips-to-Protect-your-Data-538x1024.jpg)

Closure
Thus, we hope this article has provided valuable insights into Securing Your Privacy and Data: A Guide to Thoroughly Erasing Windows 11 Before Selling Your PC. We hope you find this article informative and beneficial. See you in our next article!