Safeguarding Your Digital Life: A Comprehensive Guide to System Restore Points in Windows 10
Related Articles: Safeguarding Your Digital Life: A Comprehensive Guide to System Restore Points in Windows 10
Introduction
In this auspicious occasion, we are delighted to delve into the intriguing topic related to Safeguarding Your Digital Life: A Comprehensive Guide to System Restore Points in Windows 10. Let’s weave interesting information and offer fresh perspectives to the readers.
Table of Content
- 1 Related Articles: Safeguarding Your Digital Life: A Comprehensive Guide to System Restore Points in Windows 10
- 2 Introduction
- 3 Safeguarding Your Digital Life: A Comprehensive Guide to System Restore Points in Windows 10
- 3.1 Understanding the Importance of System Restore Points
- 3.2 Creating System Restore Points: A Step-by-Step Guide
- 3.3 When to Create System Restore Points
- 3.4 Frequently Asked Questions about System Restore Points
- 3.5 Tips for Effective System Restore Point Management
- 3.6 Conclusion
- 4 Closure
Safeguarding Your Digital Life: A Comprehensive Guide to System Restore Points in Windows 10
The digital landscape is a dynamic environment, constantly evolving with new software updates, driver installations, and user configurations. While these changes can enhance functionality and improve user experience, they also introduce potential risks. Unexpected errors, system instability, or even malicious software can disrupt normal operations, leading to data loss or compromised system performance. To mitigate these risks, Windows 10 offers a powerful tool: System Restore Points.
System Restore Points act as snapshots of your computer’s configuration, capturing the state of your operating system, installed applications, and system settings at a specific moment. These checkpoints allow you to revert your system to a previous working state, effectively undoing unwanted changes and restoring stability.
Understanding the Importance of System Restore Points
Imagine installing a new program that unintentionally causes your computer to malfunction. Or, perhaps a recent software update introduces bugs that disrupt your workflow. Without a system restore point, you might be forced to manually troubleshoot the issue, potentially losing valuable data or spending hours reinstalling applications.
System Restore Points provide a safety net, allowing you to easily roll back your system to a point before the problem occurred. This process is quick, efficient, and often eliminates the need for complex troubleshooting.
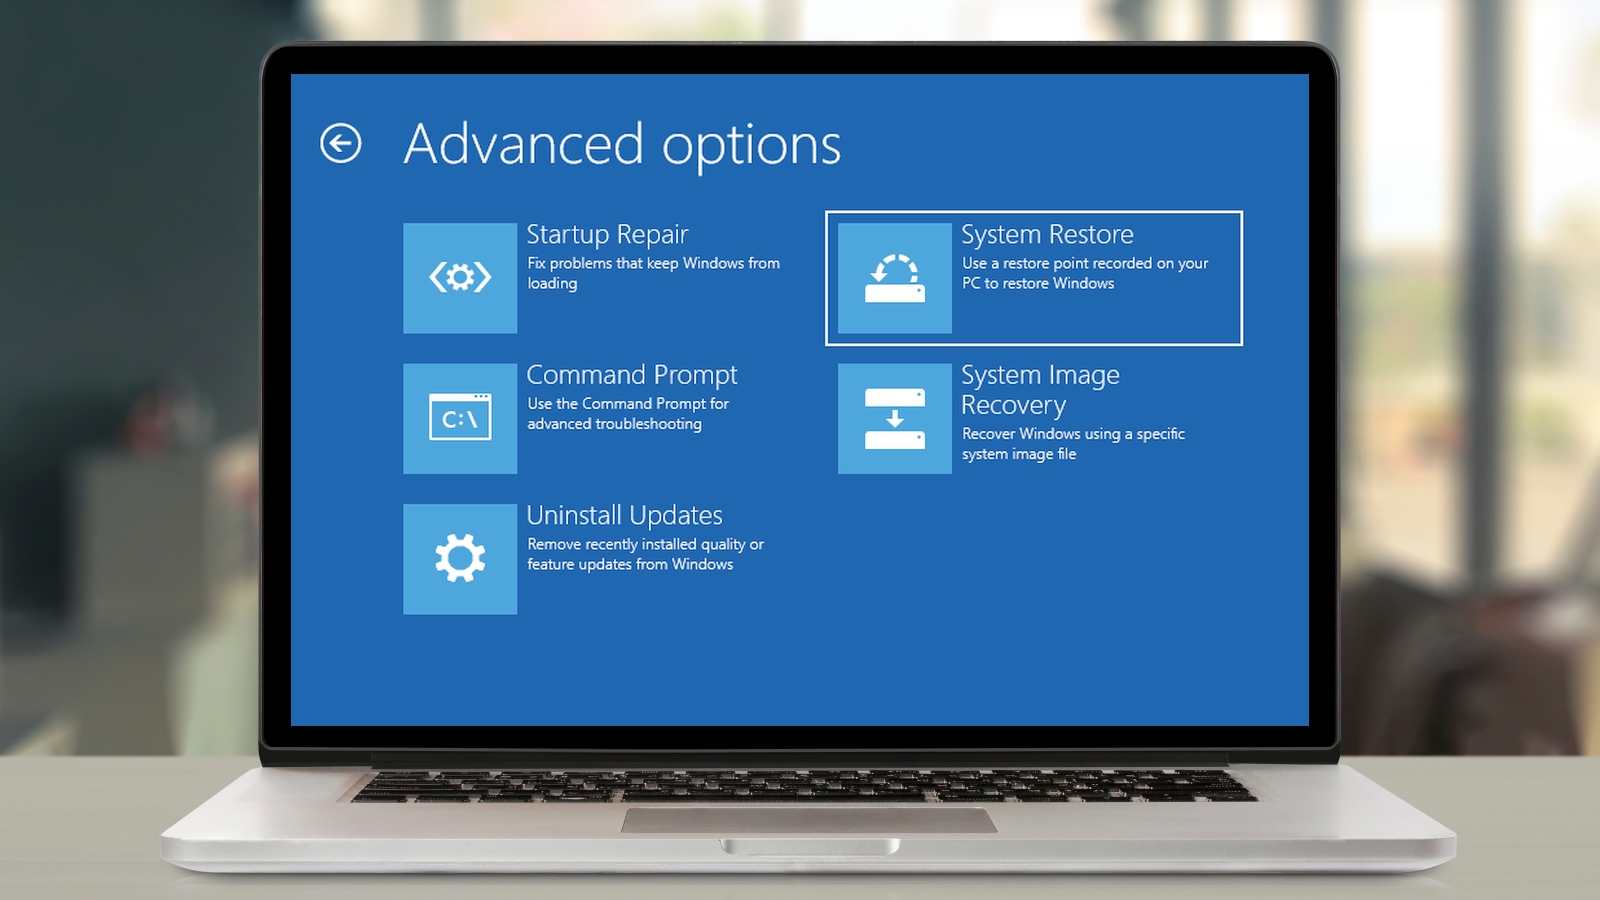
Creating System Restore Points: A Step-by-Step Guide
Creating a system restore point in Windows 10 is a straightforward process:
-
Open the Control Panel: Click the Start menu, type "Control Panel," and select the top result.
-
Navigate to System and Security: In the Control Panel window, locate and click on "System and Security."
-
Access System: Within the "System and Security" section, click on "System."
-
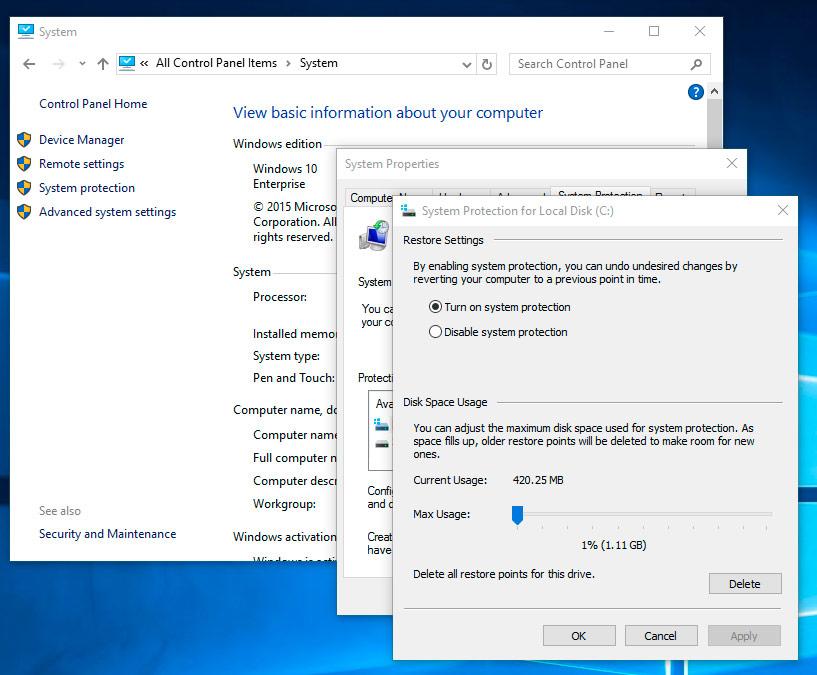
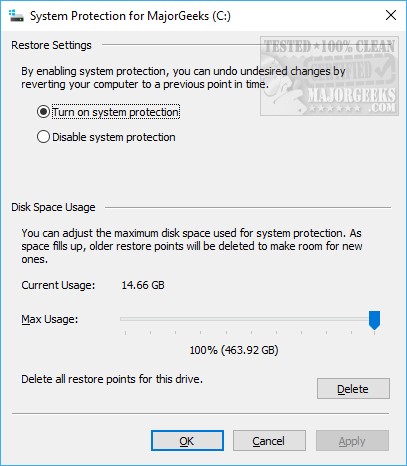
Select System Protection: On the left side of the System window, click on "System Protection."
-
Configure System Restore: In the System Protection window, select the drive you wish to protect (usually the drive where Windows is installed) and click on "Configure."
-
Enable System Restore: Make sure the "Turn on system protection" option is checked. You can adjust the disk space used for system restore points using the slider. Click "Apply" and then "OK" to save your changes.
-
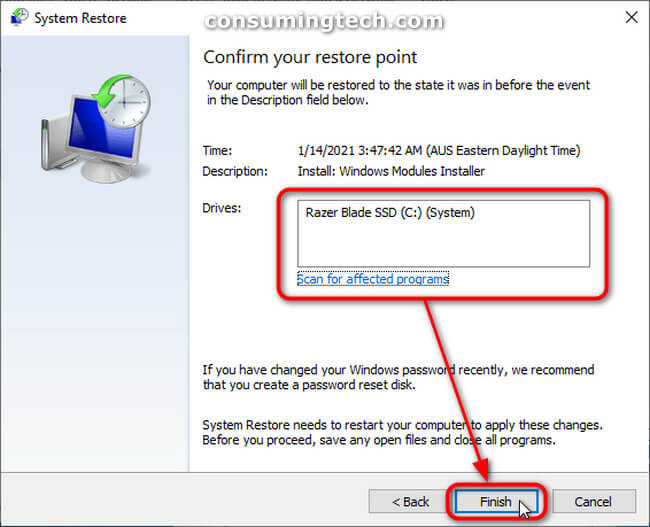
Create a Manual Restore Point: To create a restore point manually, click on the "Create" button within the System Protection window. Provide a descriptive name for the restore point and click "Create." Windows will create the restore point, capturing the current state of your system.
When to Create System Restore Points
While Windows 10 automatically creates system restore points at certain intervals, it’s beneficial to manually create them before making significant changes to your system. Here are some scenarios where creating a manual restore point is highly recommended:
- Installing New Software: Before installing a new program, especially one from an unknown source, create a restore point. This allows you to revert to a previous state if the new software causes issues.
- Updating Drivers: Updating drivers can sometimes introduce instability. Creating a restore point before updating drivers ensures a safe rollback if necessary.
- Making System Changes: Before making any major changes to your system settings, such as modifying registry entries or changing security settings, create a restore point. This safeguards your system against potential errors.
- Before Significant Data Operations: If you are about to transfer large amounts of data, perform backups, or make significant changes to your files, create a restore point. This provides a safety net in case anything goes wrong.
Frequently Asked Questions about System Restore Points
Q: What happens to my data when I use System Restore?
A: System Restore only affects system files and settings. Your personal files, such as documents, pictures, and videos, are not affected.
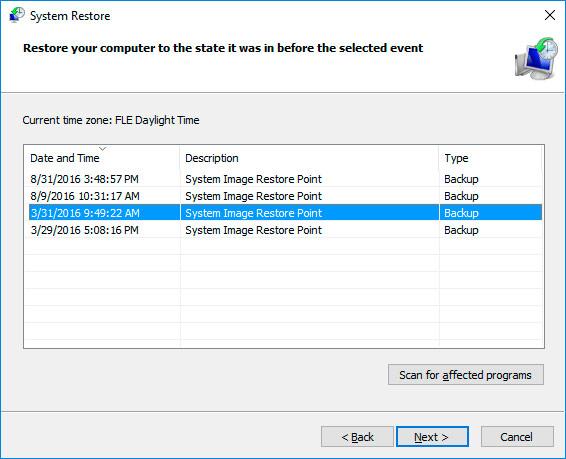
Q: Can I restore my system to a previous date?
A: Yes, you can select a specific restore point from a list of available dates.
Q: How much disk space do system restore points use?
A: You can control the amount of disk space allocated for system restore points. Windows will automatically manage the space used, deleting older restore points to make room for new ones.
Q: Can I delete system restore points?
A: Yes, you can delete system restore points manually. However, it is recommended to keep at least one recent restore point for safety.
Q: What if my system restore point is corrupted?
A: If a system restore point is corrupted, it might not be possible to restore your system. In such cases, you might need to consider other recovery options.
Tips for Effective System Restore Point Management
- Regularly Create Restore Points: Make it a habit to create restore points before major system changes or installations. This ensures you have a recent backup to revert to.
- Utilize Automatic Restore Point Creation: Windows 10 automatically creates restore points at certain intervals. You can adjust the frequency of automatic restore point creation through the System Protection settings.
- Monitor Disk Space Usage: Keep an eye on the disk space used by system restore points. You can adjust the allocated space or manually delete older restore points to manage disk space.
- Understand the Limitations of System Restore: System Restore is not a complete backup solution. It primarily restores system files and settings, not personal data. For comprehensive backups, consider using external hard drives or cloud storage solutions.
Conclusion
System Restore Points are a valuable tool for safeguarding your Windows 10 system. They provide a safety net, allowing you to easily revert your system to a previous working state, mitigating the risks associated with software updates, driver installations, or unexpected errors. By creating regular restore points and understanding their limitations, you can ensure a more stable and reliable computing experience.


![How to Use System Restore On Windows 10 [Easy Steps]](https://productkeysdl.com/wp-content/uploads/2020/01/Restore-system-files.jpg)
:format(webp)/cdn.vox-cdn.com/uploads/chorus_asset/file/19993846/restore_point_5__1_.png)
Closure
Thus, we hope this article has provided valuable insights into Safeguarding Your Digital Life: A Comprehensive Guide to System Restore Points in Windows 10. We appreciate your attention to our article. See you in our next article!