Monitoring CPU Temperature in Windows 10 Using the Command Prompt: A Comprehensive Guide
Related Articles: Monitoring CPU Temperature in Windows 10 Using the Command Prompt: A Comprehensive Guide
Introduction
With enthusiasm, let’s navigate through the intriguing topic related to Monitoring CPU Temperature in Windows 10 Using the Command Prompt: A Comprehensive Guide. Let’s weave interesting information and offer fresh perspectives to the readers.
Table of Content
- 1 Related Articles: Monitoring CPU Temperature in Windows 10 Using the Command Prompt: A Comprehensive Guide
- 2 Introduction
- 3 Monitoring CPU Temperature in Windows 10 Using the Command Prompt: A Comprehensive Guide
- 3.1 Understanding CPU Temperature Monitoring
- 3.2 Utilizing the Command Prompt for CPU Temperature Monitoring
- 3.3 Advantages of Using the Command Prompt
- 3.4 Limitations of Using the Command Prompt
- 3.5 FAQs:
- 3.6 Tips for Effective CPU Temperature Monitoring:
- 3.7 Conclusion:
- 4 Closure
Monitoring CPU Temperature in Windows 10 Using the Command Prompt: A Comprehensive Guide
The Central Processing Unit (CPU) is the brain of your computer, responsible for executing all instructions and processing data. Its performance is crucial for smooth operation, and maintaining optimal temperature is vital for its longevity. While there are numerous third-party applications available for monitoring CPU temperature, Windows 10 offers a built-in command-line solution using the Command Prompt (cmd). This guide delves into the intricacies of using the command prompt to monitor CPU temperature in Windows 10, highlighting its benefits, methods, and potential limitations.
Understanding CPU Temperature Monitoring
Monitoring CPU temperature is crucial for several reasons:
- Performance: High CPU temperatures can lead to throttling, where the CPU automatically reduces its performance to prevent overheating. This can result in slowdowns, crashes, and overall system instability.
- Hardware Longevity: Excessive heat can damage the CPU, potentially leading to premature failure. Maintaining optimal temperatures ensures the longevity of your hardware investment.
- Troubleshooting: Sudden temperature spikes can indicate underlying issues like faulty cooling solutions, dust accumulation, or even software conflicts.
Utilizing the Command Prompt for CPU Temperature Monitoring
The Command Prompt provides a powerful and flexible way to monitor CPU temperature in Windows 10. It utilizes the "wmic" command, a versatile tool for managing Windows Management Instrumentation (WMI), a data repository containing information about the system’s hardware and software.
Method 1: Using the "wmic" Command
- Open the Command Prompt: Press the Windows key + R to open the Run dialog box. Type "cmd" and press Enter.
- Execute the Command: In the Command Prompt window, type the following command and press Enter:
wmic sensor get Name, CurrentReading- Interpreting the Output: The command will display a list of sensors and their current readings. Look for entries related to "Temperature" or "CPU Temperature". The value displayed next to "CurrentReading" will represent the current CPU temperature.
Method 2: Utilizing the "wmic" Command with Specific Sensors
For more targeted temperature monitoring, you can specify the sensor name in the command. This is particularly useful if your system has multiple sensors, such as dedicated sensors for the CPU core, GPU, or motherboard.
-
Identify Sensor Names: Execute the command:
wmic sensor get Nameto list all available sensors. - Target Specific Sensors: Use the following command, replacing "SensorName" with the actual sensor name from the previous step:
wmic sensor where Name="SensorName" get CurrentReadingExample:
If your CPU sensor is named "K10 Temperature", the command would be:
wmic sensor where Name="K10 Temperature" get CurrentReadingMethod 3: Continuous Monitoring with Batch Scripts
For ongoing temperature monitoring, you can create a batch script that repeatedly executes the "wmic" command and logs the results.
- Create a Batch File: Open Notepad and paste the following code:
@echo off
:loop
wmic sensor where Name="SensorName" get CurrentReading >> temperature.txt
timeout /t 5 /nobreak >nul
goto loop- Save the Script: Save the file with a ".bat" extension (e.g., "temp_monitor.bat").
- Run the Script: Double-click the saved batch file. This will continuously monitor the specified sensor and log the readings to a file named "temperature.txt" in the same directory as the batch file.
Method 4: Using PowerShell
PowerShell, a more advanced scripting language, offers similar functionality to the command prompt.
- Open PowerShell: Search for "PowerShell" in the Start menu and run it as administrator.
- Execute the Command: Enter the following command, replacing "SensorName" with the actual sensor name:
Get-WmiObject -Class Win32_TemperatureSensor | Where-Object $_.Name -match "SensorName" | Select-Object Name, CurrentReadingAdvantages of Using the Command Prompt
- Built-in: No need to download or install any third-party software.
- Flexibility: Allows for customization and scripting for continuous monitoring.
- Powerful: Provides access to a wide range of system information through WMI.
Limitations of Using the Command Prompt
- Limited Graphical Interface: Data is presented in a text-based format, requiring manual interpretation.
- Potential for Errors: Incorrect commands or syntax can lead to errors.
- Less User-Friendly: Requires basic command-line knowledge.
FAQs:
Q: How often should I monitor my CPU temperature?
A: It is recommended to monitor CPU temperature regularly, especially during demanding tasks like gaming, video editing, or rendering. You can also set up alerts for high temperatures.
Q: What is a safe CPU temperature?
A: Safe CPU temperatures vary depending on the specific CPU model. However, a general guideline is that the CPU should not exceed 85-90 degrees Celsius (185-194 degrees Fahrenheit) under normal load. Check your CPU manufacturer’s specifications for specific temperature recommendations.
Q: What should I do if my CPU temperature is too high?
A: If your CPU temperature is consistently high, consider the following:
- Clean your cooling system: Dust accumulation can hinder airflow and increase temperatures.
- Check the thermal paste: Over time, the thermal paste that transfers heat from the CPU to the heatsink can dry out, reducing its effectiveness.
- Ensure proper airflow: Make sure your computer case has adequate ventilation.
- Monitor for software conflicts: Some software programs can cause excessive CPU load and lead to high temperatures.
Tips for Effective CPU Temperature Monitoring:
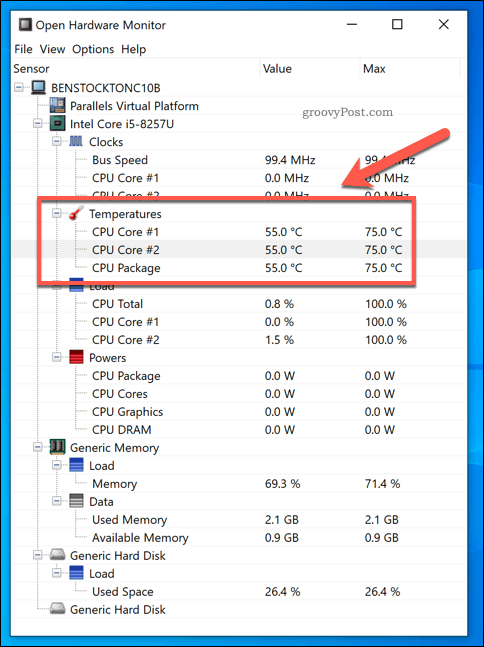
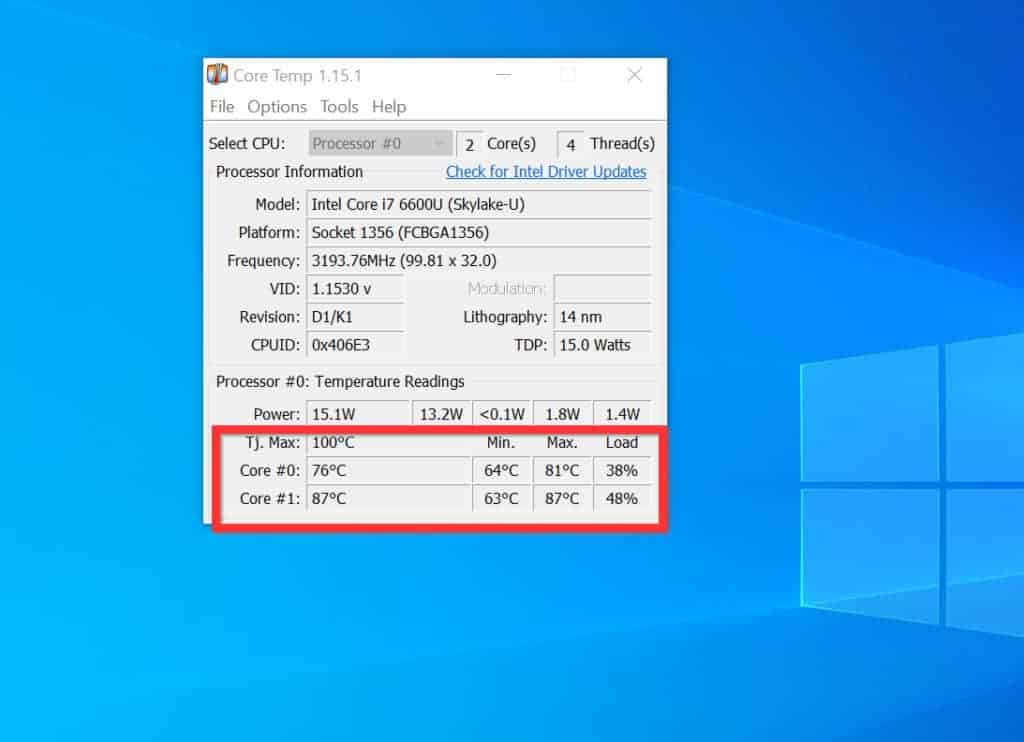
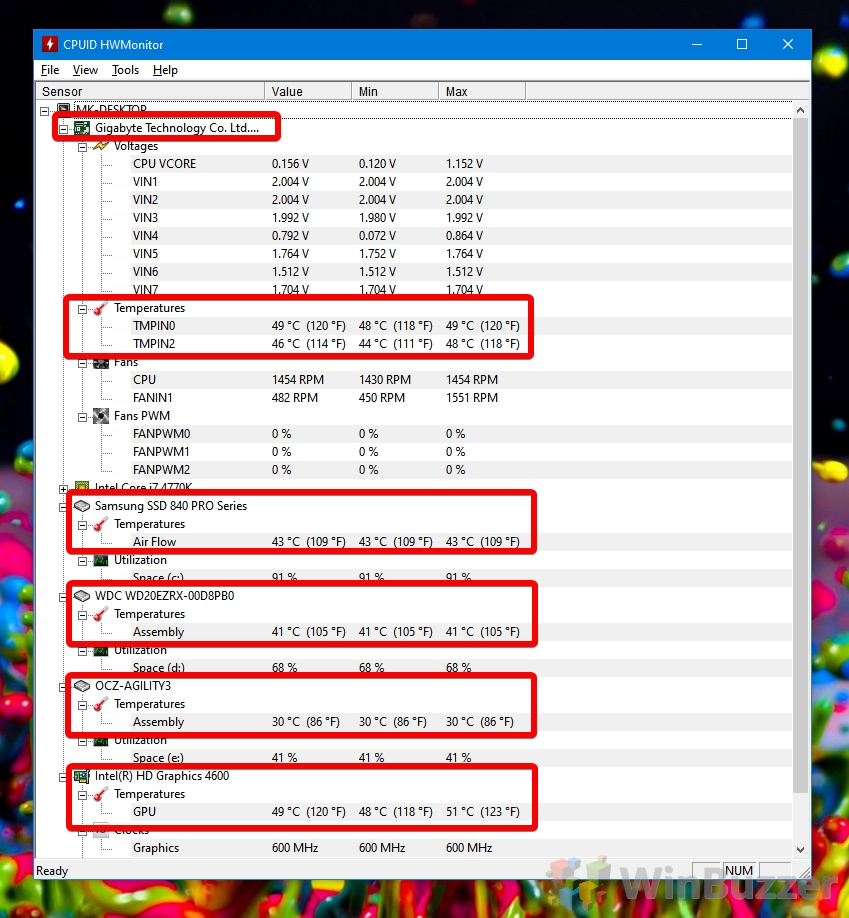
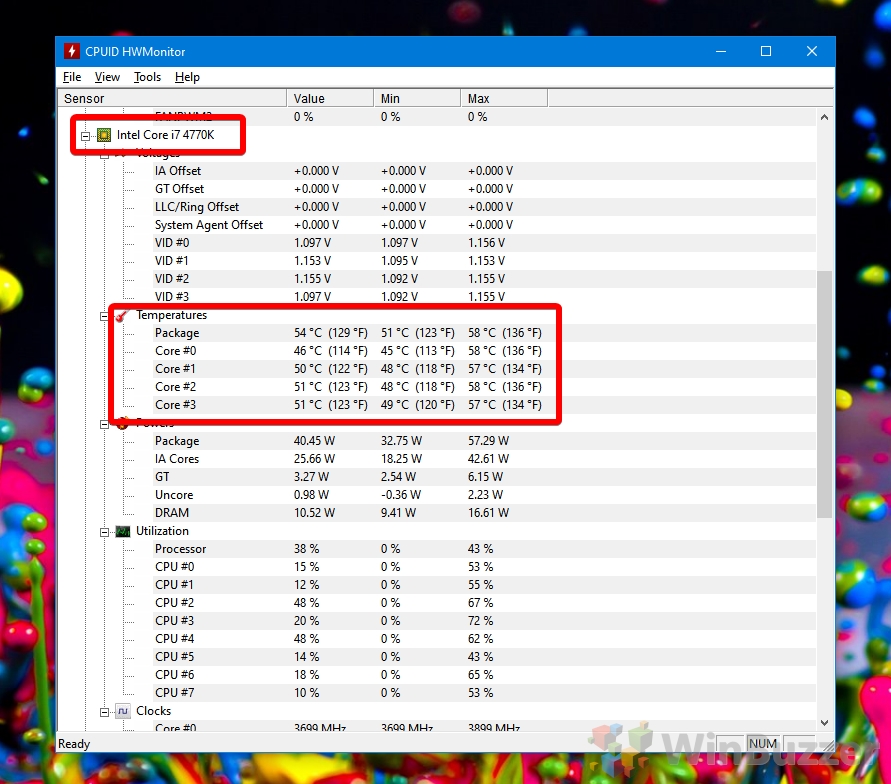
- Use a dedicated monitoring tool: While the command prompt offers flexibility, consider using a dedicated third-party monitoring tool for a user-friendly and visually appealing interface.
- Monitor during demanding tasks: Pay close attention to CPU temperature during activities that put a heavy load on the processor.
- Set up alerts: Configure your monitoring software to notify you if the CPU temperature exceeds a predefined threshold.
- Keep your system clean: Regularly clean your computer case and cooling system to prevent dust accumulation.
Conclusion:
Monitoring CPU temperature is crucial for maintaining optimal performance and ensuring the longevity of your hardware. While the command prompt offers a powerful and flexible way to monitor CPU temperature in Windows 10, it requires some technical knowledge and familiarity with command-line syntax. For a more user-friendly experience, consider using dedicated third-party monitoring tools. By staying informed about your CPU temperature, you can proactively address potential issues and ensure the smooth and reliable operation of your computer.


Closure
Thus, we hope this article has provided valuable insights into Monitoring CPU Temperature in Windows 10 Using the Command Prompt: A Comprehensive Guide. We appreciate your attention to our article. See you in our next article!