Mastering the Art of a Custom Windows 10 Installation: A Comprehensive Guide
Related Articles: Mastering the Art of a Custom Windows 10 Installation: A Comprehensive Guide
Introduction
With enthusiasm, let’s navigate through the intriguing topic related to Mastering the Art of a Custom Windows 10 Installation: A Comprehensive Guide. Let’s weave interesting information and offer fresh perspectives to the readers.
Table of Content
Mastering the Art of a Custom Windows 10 Installation: A Comprehensive Guide
In the realm of computing, the operating system serves as the foundation upon which all other software and applications operate. For many users, the default installation process offered by Windows 10 provides a readily accessible and convenient starting point. However, a deeper understanding of the installation process reveals a world of customization possibilities, allowing users to tailor their operating system to meet specific needs and preferences. This guide explores the intricacies of a custom Windows 10 installation, outlining its benefits, essential steps, and potential pitfalls.
Understanding the Significance of a Custom Installation
A custom Windows 10 installation goes beyond the typical "click-and-install" approach. It involves a meticulous selection of components, configurations, and settings, enabling users to fine-tune their operating system for optimal performance, security, and stability. This approach offers several distinct advantages:
- Enhanced Performance: By carefully choosing the necessary drivers and software, users can minimize bloatware and unnecessary programs, leading to a leaner and faster system.
- Tailored Security: Custom installations allow users to implement specific security measures, such as disabling unnecessary services or enabling advanced firewall settings, to strengthen their system’s defenses against potential threats.
- Optimized Storage Management: Users can allocate disk space strategically, ensuring ample room for essential files and applications while minimizing the risk of running out of storage.
- Greater Control: Custom installations provide a granular level of control over various aspects of the operating system, allowing users to personalize their experience according to their specific requirements.
The Steps Involved in a Custom Windows 10 Installation
A custom Windows 10 installation requires a methodical approach, encompassing several key steps:
-
Preparation:
- Backup Essential Data: Before embarking on a custom installation, it is crucial to back up all important files, applications, and settings. This safeguards against data loss during the process.
- Gather Necessary Drivers: Identify and download the latest drivers for all hardware components, including motherboard, graphics card, network adapter, and storage devices.
- Acquire a Windows 10 Installation Media: Obtain an official Windows 10 installation USB drive or DVD. This can be downloaded from Microsoft’s website or purchased from reputable retailers.
-
Boot from the Installation Media:
- Change Boot Order: Access the BIOS or UEFI settings of your computer and adjust the boot order to prioritize the USB drive or DVD containing the Windows 10 installation media.
- Start the Installation: Once the system boots from the installation media, follow the on-screen prompts to initiate the setup process.
-
Custom Installation Options:
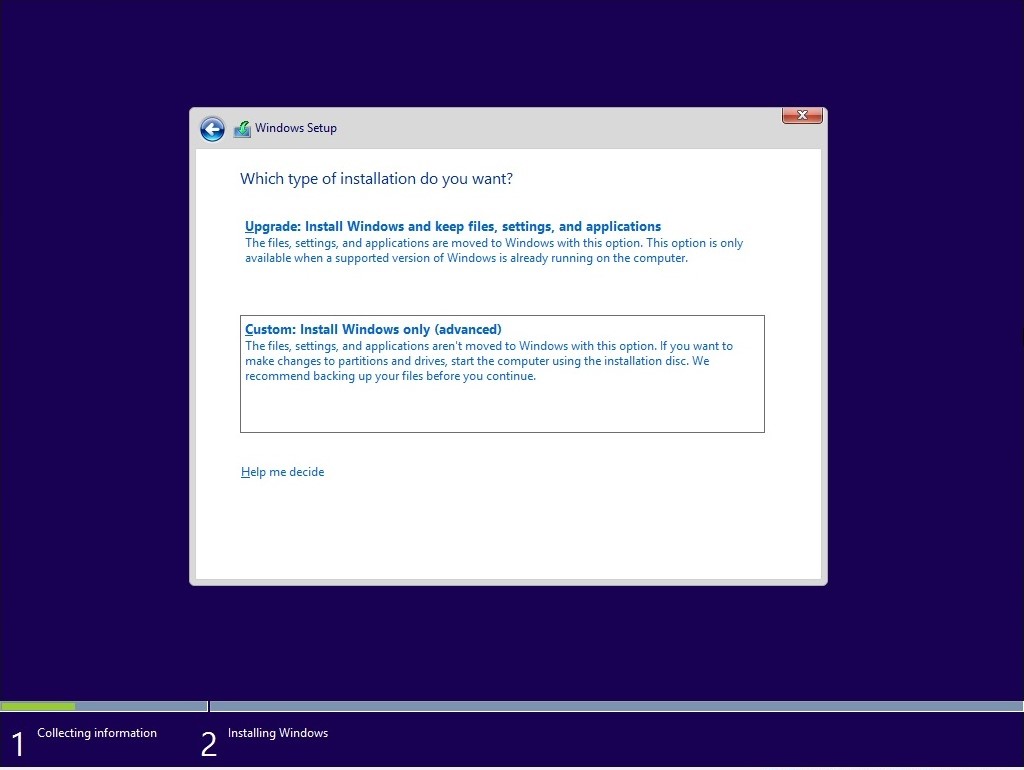
- Choose Custom Installation: Select the "Custom: Install Windows only (advanced)" option to access the advanced installation settings.
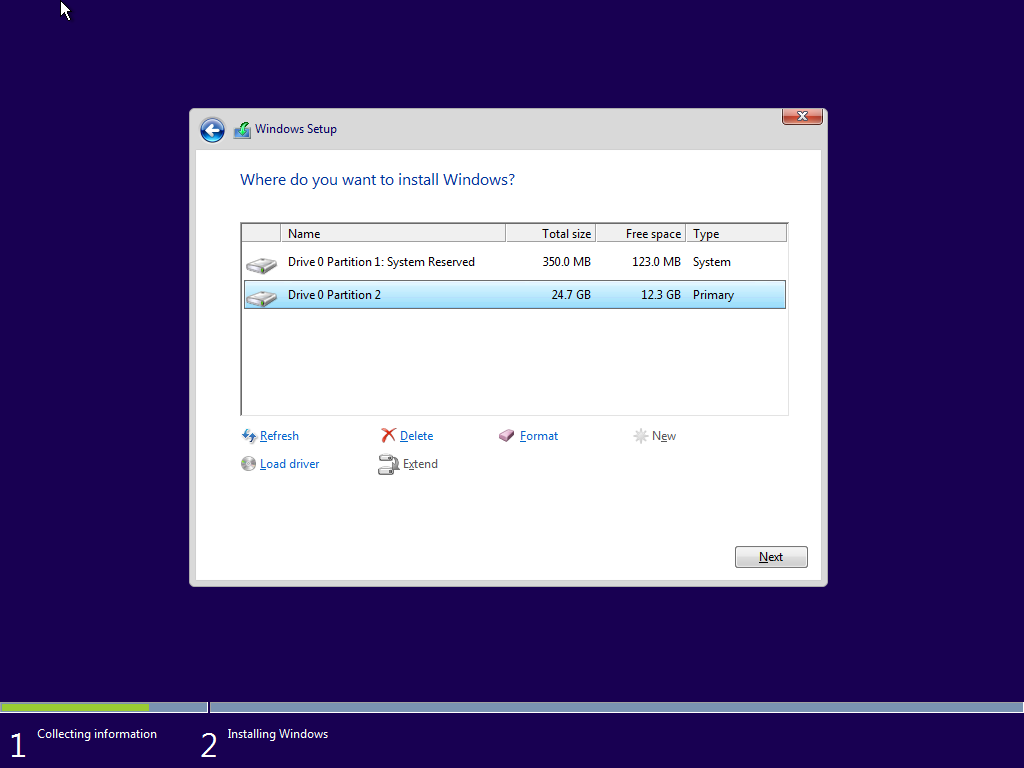
- Partition the Hard Drive: This step allows users to create and format partitions on their hard drive. Carefully allocate space for the Windows 10 installation, data storage, and other purposes.
- Select the Destination Partition: Choose the designated partition where Windows 10 will be installed.
-
Installation Process:
- File Copying and Setup: The Windows 10 installation process involves copying files and configuring the operating system. This may take several minutes or even hours depending on the system’s hardware and the size of the installation files.
- Initial Setup: Upon completion of the installation, the system will prompt for basic configuration settings, such as language, time zone, and user account creation.
-
Post-Installation Configuration:
- Install Drivers: After the initial setup, install all necessary drivers for your hardware components. This ensures proper functionality and optimal performance.
- Customize Settings: Configure various settings according to your preferences, including display resolution, power options, and network connections.
- Install Applications: Install essential applications and software that are not included in the default Windows 10 installation.
- Finalize Security Settings: Review and adjust security settings, including firewall, antivirus, and user account permissions, to enhance system protection.
Common FAQs Regarding Custom Windows 10 Installations
Q: Will I lose all my data during a custom installation?
A: Yes, if you choose to format the entire hard drive during the installation process, all data will be erased. Therefore, it is crucial to back up all important data before proceeding.
Q: Can I upgrade from an existing Windows version to Windows 10 without a custom installation?
A: Yes, Microsoft offers an upgrade path from previous Windows versions to Windows 10. However, this process may not provide the same level of control and customization as a custom installation.
Q: Is it necessary to have a product key for a custom installation?
A: Yes, a valid Windows 10 product key is required to activate the operating system after installation.
Q: Can I create a bootable USB drive for a custom installation?
A: Yes, Microsoft provides a tool called the Media Creation Tool that allows users to create bootable USB drives for installing Windows 10.
Q: What if I encounter errors during the installation process?
A: Errors during installation can occur due to various factors, such as incompatible hardware or corrupted installation files. Refer to Microsoft’s support resources or consult a qualified technician for assistance.
Tips for a Successful Custom Windows 10 Installation
- Thorough Research: Before starting the installation, research the specific hardware components and their compatibility with Windows 10.
- Create a System Image: For added safety, create a system image backup before proceeding with the custom installation.
- Check for Updates: Ensure that the BIOS or UEFI firmware and all drivers are up to date before starting the installation.
- Use a Dedicated USB Drive: Use a dedicated USB drive for the installation media to avoid accidental data loss.
- Document the Process: Keep a record of the steps taken during the installation process, including partition sizes and driver installation details.
Conclusion
A custom Windows 10 installation offers a powerful approach to tailoring the operating system to specific needs and preferences. By understanding the steps involved, taking necessary precautions, and utilizing available resources, users can achieve a more optimized, secure, and personalized computing experience. While the process may seem daunting at first, the benefits of a custom installation far outweigh the initial effort, ultimately empowering users to take control of their digital environment.


![How To Create a Custom Partition to Install Windows [Full Guide]](https://images.wondershare.com/recoverit/article/installing-windows-partition.jpg)


Closure
Thus, we hope this article has provided valuable insights into Mastering the Art of a Custom Windows 10 Installation: A Comprehensive Guide. We appreciate your attention to our article. See you in our next article!