Managing User Accounts and Groups in Windows 10: A Comprehensive Guide
Related Articles: Managing User Accounts and Groups in Windows 10: A Comprehensive Guide
Introduction
With enthusiasm, let’s navigate through the intriguing topic related to Managing User Accounts and Groups in Windows 10: A Comprehensive Guide. Let’s weave interesting information and offer fresh perspectives to the readers.
Table of Content
Managing User Accounts and Groups in Windows 10: A Comprehensive Guide
![How to add and manage user accounts in Windows 10 [Tip] dotTech](https://dt.azadicdn.com/wp-content/uploads/2015/08/new_account_4.png?200)
Windows 10 offers a robust system for managing user accounts and groups, providing granular control over access to system resources and applications. This guide will delve into the intricacies of managing these elements, highlighting their importance in securing your system and optimizing user experience.
Understanding User Accounts and Groups
A user account represents an individual user on a Windows 10 system. Each account has a unique username and password, allowing for personalized settings, file access, and application usage. Groups, on the other hand, are collections of user accounts that share similar privileges and access permissions.
The Significance of User Account Management
Effectively managing user accounts and groups is paramount for several reasons:
- Security: By assigning appropriate permissions to users and groups, administrators can restrict access to sensitive data and applications, safeguarding the system from unauthorized access and potential security threats.
- Resource Allocation: User accounts and groups allow for controlled allocation of system resources, ensuring that each user has access to the resources necessary for their tasks while preventing overuse or conflicts.
- Productivity: Well-defined user accounts and groups streamline workflows, enabling users to perform tasks efficiently without encountering access limitations or confusion.
- Compliance: Organizations often have specific regulations regarding user access and data security. User account management helps ensure compliance with these regulations.
Navigating the User Accounts Interface
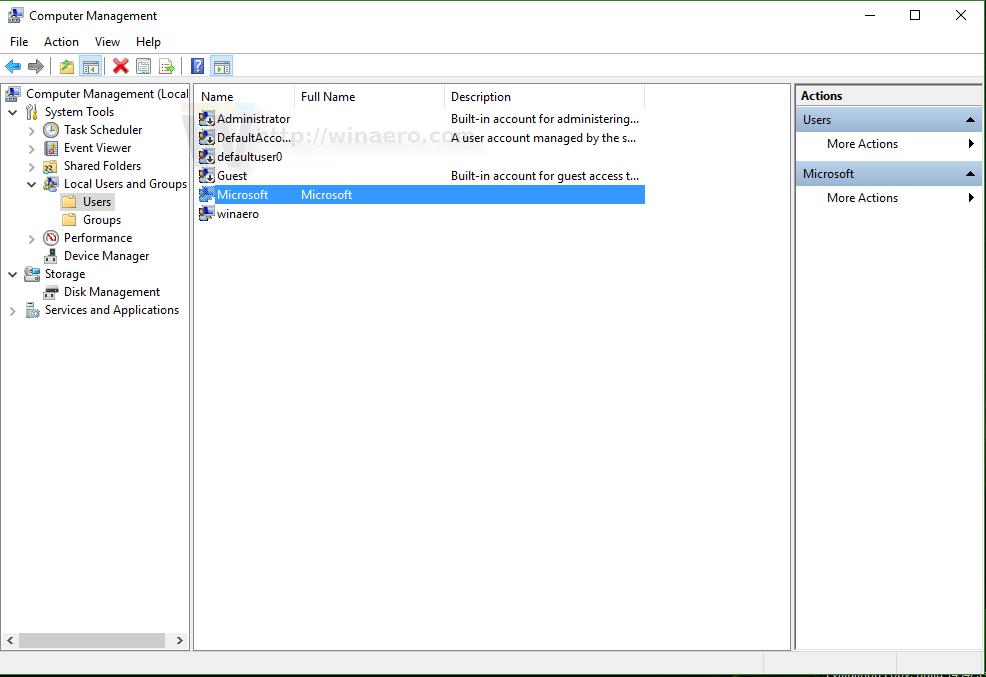
In Windows 10, user account management is primarily handled through the "Local Users and Groups" console. This console provides a centralized platform for managing local users, groups, and their associated permissions.
Accessing the "Local Users and Groups" Console
- Search for "Computer Management": Open the Windows search bar and type "Computer Management."
- Select "Computer Management": Click on the "Computer Management" application from the search results.
- Navigate to "Local Users and Groups": In the left pane of the Computer Management window, expand "Local Users and Groups."
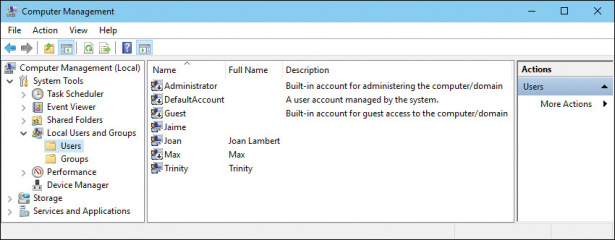
Managing User Accounts
The "Users" folder within the "Local Users and Groups" console houses all local user accounts on the system. This is where you can create new accounts, modify existing ones, and manage their permissions.
Creating a New User Account
- Right-click on "Users": In the "Users" folder, right-click and select "New" -> "User."
- Enter User Details: In the "New User" dialog box, provide a username, full name, and password for the new user.
-
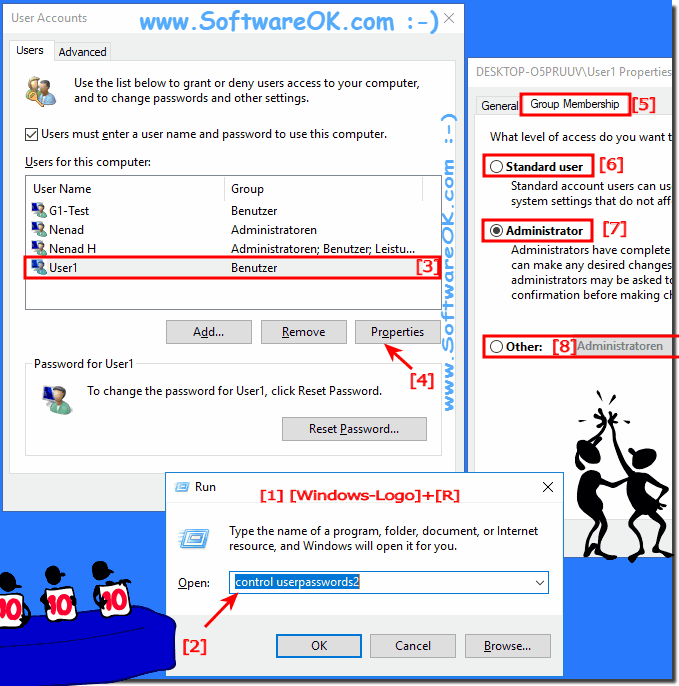
Set Account Type: Choose the account type:
- Standard User: Has limited access to the system and cannot install software or make changes to system settings.
- Administrator: Has full control over the system, including the ability to install software, modify system settings, and manage other user accounts.
- Finish: Click "Create" to complete the process.
Modifying an Existing User Account
- Locate the User: Right-click on the desired user account in the "Users" folder.
- Choose "Properties": Select "Properties" from the context menu.
- Modify User Details: The "Properties" window allows you to modify the user’s name, password, account type, and other settings.
- Apply Changes: Click "Apply" to save the modifications.
Deleting a User Account
- Select the User: Right-click on the user account you wish to delete.
- Confirm Deletion: Choose "Delete" from the context menu and confirm the deletion in the subsequent prompt.
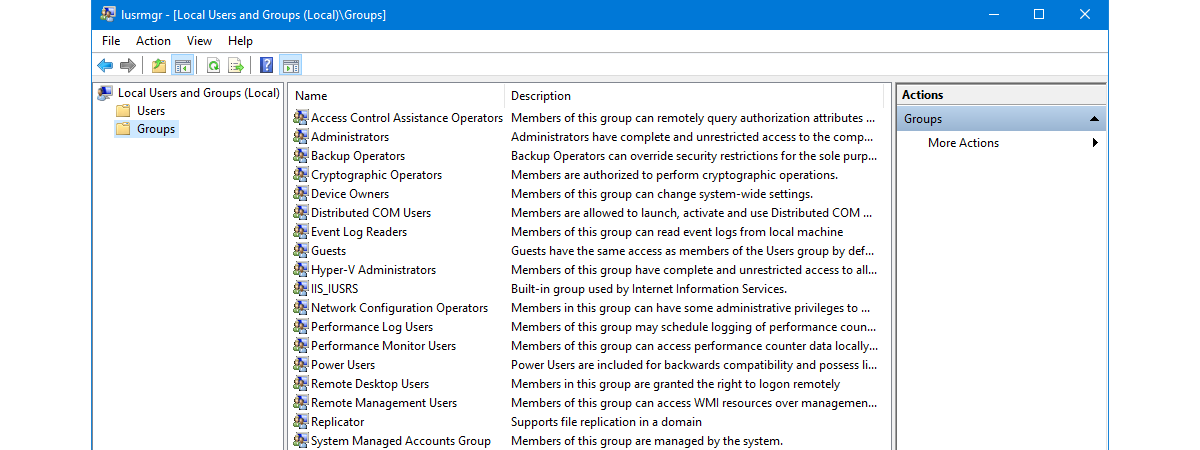
Managing Groups
The "Groups" folder in the "Local Users and Groups" console houses predefined groups and allows for creating custom groups. Groups are essential for organizing users and assigning permissions collectively.
Creating a New Group
- Right-click on "Groups": In the "Groups" folder, right-click and select "New" -> "Group."
- Name the Group: Provide a name for the new group in the "New Group" dialog box.
- Finish: Click "Create" to finalize the group creation.
Adding Users to a Group
- Right-click on the Group: In the "Groups" folder, right-click on the desired group.
- Select "Members": Choose "Members" from the context menu.
- Add Users: Click "Add" and select the users you wish to add to the group.
- Confirm: Click "OK" to finalize the changes.
Removing Users from a Group
- Access Group Members: Right-click on the group and select "Members."
- Remove Users: Select the users to remove from the group and click "Remove."
- Confirm: Click "OK" to finalize the changes.
Managing Permissions
Permissions determine what actions a user or group can perform on specific system resources, including files, folders, applications, and network drives.
Assigning Permissions
- Locate the Resource: Navigate to the specific file, folder, or application for which you want to assign permissions.
- Right-click and Select "Properties": Right-click on the resource and choose "Properties."
- Access the "Security" Tab: Click on the "Security" tab in the "Properties" window.
- Manage Permissions: Click "Edit" to manage permissions for the resource.
- Add Users or Groups: Click "Add" to add users or groups to the permission list.
- Grant Permissions: Check the boxes next to the permissions you want to grant to the user or group.
- Apply Changes: Click "Apply" to save the changes.
Understanding Permission Levels
- Full control: Grants complete access to the resource, allowing users to read, write, modify, and delete files, as well as change permissions.
- Modify: Allows users to read, write, and modify files, but not delete or change permissions.
- Read: Grants users the ability to view the contents of the resource but not modify them.
- Write: Allows users to create new files or modify existing ones within the resource.
- Special Permissions: These permissions grant specific access rights, such as the ability to delete files or change permissions.
Troubleshooting Common Issues
While managing user accounts and groups is generally straightforward, users may encounter various issues. Here are some common troubleshooting tips:
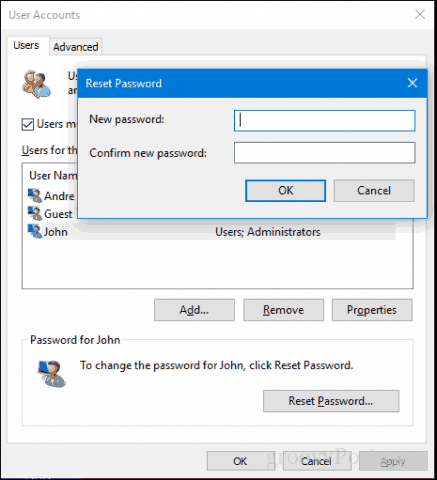
- Password Reset: If a user forgets their password, an administrator can reset it through the "User Properties" window.
- Account Lockout: If a user repeatedly enters an incorrect password, their account may be locked out. An administrator can unlock the account through the "User Properties" window.
- Permission Conflicts: If a user experiences access issues, it may be due to conflicting permissions. Verify the user’s permissions for the specific resource.
- Group Membership Issues: Ensure that users are correctly assigned to the appropriate groups and that those groups have the necessary permissions.
FAQs
Q: Can I create a user account without a password?
A: While it is possible to create a user account without a password, it is highly discouraged for security reasons. A password protects the account from unauthorized access.
Q: What are the differences between local and domain users?
A: Local users are managed on the local computer, while domain users are managed on a central server (domain controller). Domain users have access to resources across the network, while local users are restricted to the local computer.
Q: Can I assign different permissions to different groups for the same resource?
A: Yes, you can assign different permissions to different groups for the same resource. This allows for fine-grained control over access.
Q: How can I ensure that users cannot change their own passwords?
A: You can disable the ability for users to change their passwords through the "User Properties" window. This is often done for security reasons, particularly for shared accounts.
Tips for Effective User Account Management
- Use strong passwords: Encourage users to create strong passwords that are difficult to guess.
- Implement regular password changes: Require users to change their passwords periodically to reduce the risk of unauthorized access.
- Enable account lockout: Configure account lockout policies to prevent unauthorized access after multiple incorrect password attempts.
- Use group policies: Group policies provide a centralized way to manage user account settings across multiple computers.
- Document user accounts and permissions: Maintain detailed documentation of user accounts and permissions to ensure consistency and facilitate troubleshooting.
- Use a password manager: A password manager can help users securely store and manage their passwords.
Conclusion
Managing user accounts and groups in Windows 10 is crucial for maintaining security, optimizing resource allocation, and enhancing user experience. By understanding the intricacies of user account management and implementing best practices, organizations and individuals can ensure a secure and efficient computing environment. Regular review and updates to user accounts and permissions are essential to maintain optimal security and productivity.

![How to add and manage user accounts in Windows 10 [Tip] Reviews, news, tips, and tricks](https://dt.azadicdn.com/wp-content/uploads/2015/08/new_account_1a.png?5006)
Closure
Thus, we hope this article has provided valuable insights into Managing User Accounts and Groups in Windows 10: A Comprehensive Guide. We thank you for taking the time to read this article. See you in our next article!