Managing Local Users and Groups in Windows 11: A Comprehensive Guide
Related Articles: Managing Local Users and Groups in Windows 11: A Comprehensive Guide
Introduction
With great pleasure, we will explore the intriguing topic related to Managing Local Users and Groups in Windows 11: A Comprehensive Guide. Let’s weave interesting information and offer fresh perspectives to the readers.
Table of Content
- 1 Related Articles: Managing Local Users and Groups in Windows 11: A Comprehensive Guide
- 2 Introduction
- 3 Managing Local Users and Groups in Windows 11: A Comprehensive Guide
- 3.1 Understanding the Foundation: Users and Groups
- 3.2 Navigating the User Management Interface: The Local Users and Groups Tool
- 3.3 Essential User Management Tasks
- 3.4 Essential Group Management Tasks
- 3.5 Importance and Benefits of Local User and Group Management
- 3.6 FAQs
- 3.7 Tips
- 3.8 Conclusion
- 4 Closure
Managing Local Users and Groups in Windows 11: A Comprehensive Guide
Windows 11, like its predecessors, employs a robust system for managing local users and groups, offering granular control over access and permissions within a specific computer. This feature is crucial for maintaining system security, streamlining administrative tasks, and ensuring that the right individuals have the necessary privileges to perform their roles. This article delves into the intricacies of managing local users and groups in Windows 11, providing a comprehensive understanding of the tools, processes, and best practices involved.
Understanding the Foundation: Users and Groups
Before embarking on the journey of managing local users and groups, it is essential to grasp the fundamental concepts:
Users: These are individual accounts that allow access to the computer. Each user account possesses a unique username and password, enabling them to log in and interact with the system. Users can be categorized as:
- Standard Users: These accounts have limited access, primarily for everyday tasks like browsing the internet, using applications, and accessing personal files. They cannot install software, modify system settings, or manage other user accounts.
- Administrators: These accounts have full control over the system, enabling them to install software, modify system settings, manage user accounts, and perform other administrative tasks.
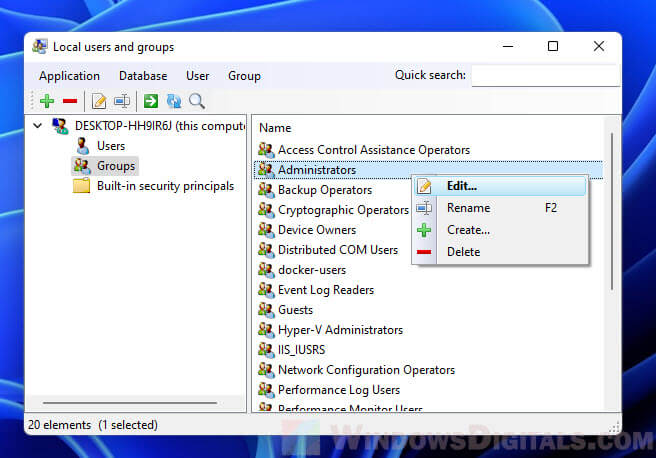
Groups: Groups are collections of user accounts that share common access privileges. This simplifies the process of managing permissions, as changes can be applied to the entire group rather than individual users. Groups can be:
- Built-in Groups: These are predefined groups with specific privileges and roles, such as Administrators, Users, and Guests.
- Custom Groups: These are user-defined groups that can be tailored to specific needs, allowing for flexible permission management based on departmental roles, project teams, or other criteria.
Navigating the User Management Interface: The Local Users and Groups Tool
Windows 11 provides a dedicated tool for managing local users and groups, accessible through the "Local Users and Groups" console. This tool offers a user-friendly interface for creating, deleting, modifying, and managing user accounts and groups.
Accessing the Local Users and Groups Tool:
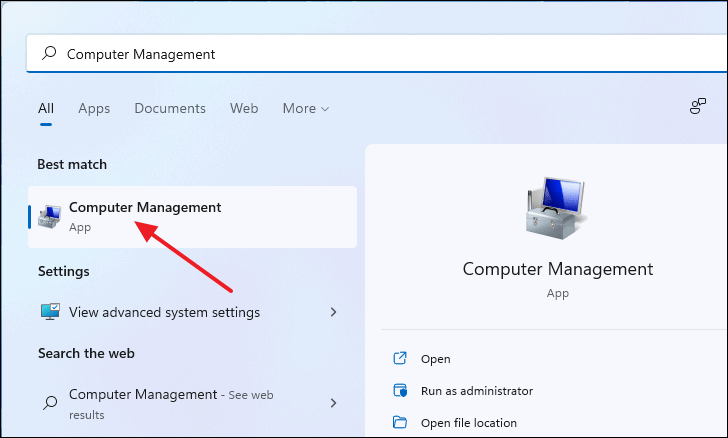
- Search: Type "Local Users and Groups" in the Windows search bar.
- Run Command: Press the Windows key + R, type "lusrmgr.msc" in the Run dialog box, and click "OK."
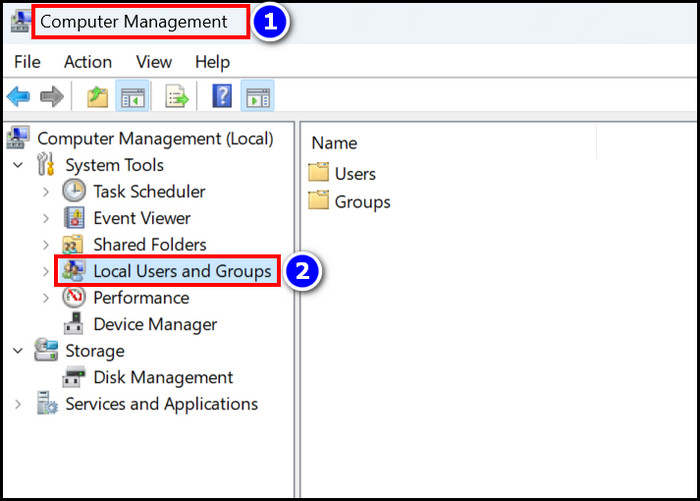
- Control Panel: Open the Control Panel, navigate to "Administrative Tools," and double-click "Computer Management." Expand the "Local Users and Groups" section.
Essential User Management Tasks
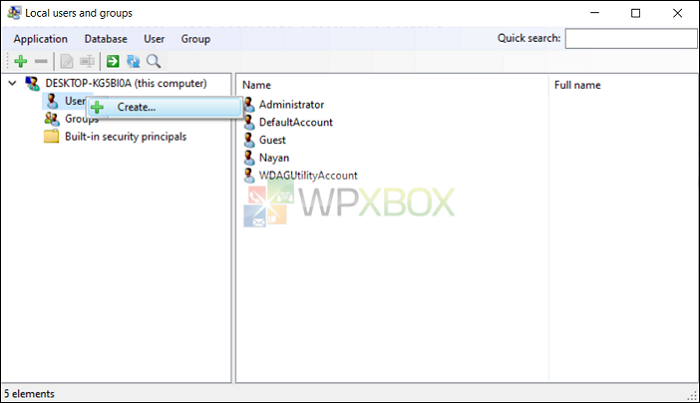
1. Creating New Users:
- Access the Tool: Open the "Local Users and Groups" console.
- Navigate to Users: Locate the "Users" folder.
- Right-click: Right-click within the "Users" folder and select "New" -> "User."
- Provide Details: Enter the desired username, full name, and password.
- Set Account Type: Choose the account type (Administrator, Standard User) based on the user’s role and privileges.
- Confirm Creation: Click "Create" to finalize the user account creation.
2. Modifying User Accounts:
- Locate the User: Navigate to the "Users" folder and locate the user account you wish to modify.
- Right-click: Right-click on the user account and select "Properties."
- Access Properties: The user account properties window will open, providing various options for modification.
- Adjust Settings: Modify the user’s password, account type, group memberships, or other settings as needed.
- Apply Changes: Click "Apply" and "OK" to save the modifications.
3. Deleting User Accounts:
- Locate the User: Navigate to the "Users" folder and locate the user account you wish to delete.
- Right-click: Right-click on the user account and select "Delete."
- Confirm Deletion: Confirm the deletion by clicking "Yes" in the prompt.
4. Managing User Passwords:
- Locate the User: Navigate to the "Users" folder and locate the user account you wish to manage.
- Right-click: Right-click on the user account and select "Set Password."
- Enter New Password: Enter the new password twice for confirmation.
- Apply Changes: Click "OK" to save the password change.
Essential Group Management Tasks
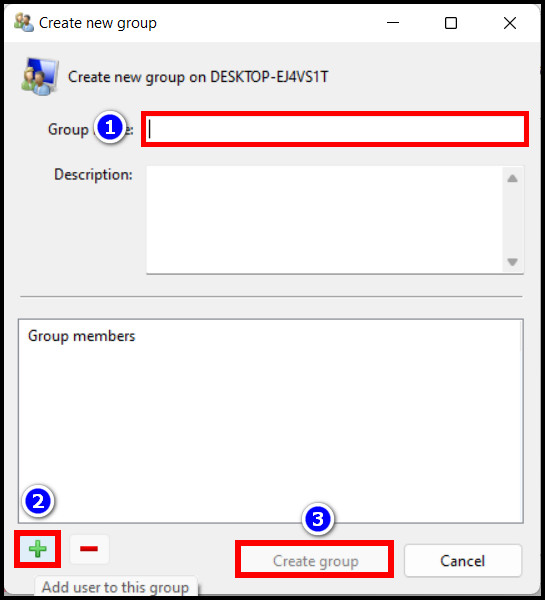
1. Creating New Groups:
- Access the Tool: Open the "Local Users and Groups" console.
- Navigate to Groups: Locate the "Groups" folder.
- Right-click: Right-click within the "Groups" folder and select "New" -> "Group."
- Provide Details: Enter the desired group name and description.
- Confirm Creation: Click "Create" to finalize the group creation.
2. Adding Users to Groups:
- Locate the Group: Navigate to the "Groups" folder and locate the group you wish to modify.
- Right-click: Right-click on the group and select "Properties."
- Access Members Tab: Click on the "Members" tab.
- Add Users: Click "Add" and select the users you want to add to the group.
- Confirm Changes: Click "OK" to save the changes.
3. Removing Users from Groups:
- Locate the Group: Navigate to the "Groups" folder and locate the group you wish to modify.
- Right-click: Right-click on the group and select "Properties."
- Access Members Tab: Click on the "Members" tab.
- Remove Users: Select the users you want to remove from the group and click "Remove."
- Confirm Changes: Click "OK" to save the changes.
4. Modifying Group Properties:
- Locate the Group: Navigate to the "Groups" folder and locate the group you wish to modify.
- Right-click: Right-click on the group and select "Properties."
- Access Properties: The group properties window will open, providing options for modification.
- Adjust Settings: Modify the group description, add or remove users, or adjust other settings as needed.
- Apply Changes: Click "Apply" and "OK" to save the modifications.
Importance and Benefits of Local User and Group Management
Managing local users and groups in Windows 11 offers numerous benefits, contributing to a secure, efficient, and organized computing environment:
- Enhanced Security: By assigning specific permissions to users and groups, you can restrict access to sensitive data and resources, preventing unauthorized modifications or misuse.
- Streamlined Administration: Managing user accounts and permissions through groups simplifies the process, reducing the need for repetitive tasks and minimizing the risk of errors.
- Improved Collaboration: Creating custom groups based on roles or project teams facilitates collaboration by granting appropriate access to specific resources and data.
- Compliance with Regulations: Properly managing user accounts and permissions ensures compliance with data security regulations and industry standards.
- System Optimization: By granting the right permissions to users and groups, you can optimize system performance and prevent unnecessary resource consumption.
FAQs
1. What is the difference between a local user and a domain user?
Local users are accounts created and managed directly on the computer, while domain users are managed centrally on a domain controller and can access multiple computers within the domain.
2. Can I create a user with administrative privileges without logging in as an administrator?
No, you need to log in as an administrator to create a user with administrative privileges.
3. How can I reset a forgotten user password?
If you have forgotten the password for a local user account, you can use the "Local Security Policy" tool to reset it. However, this requires administrator privileges.
4. What are the best practices for managing local users and groups?
- Use strong passwords and enforce password complexity requirements.
- Regularly review user accounts and group memberships to ensure they are still relevant.
- Minimize the number of administrator accounts and only grant administrative privileges when absolutely necessary.
- Implement a system for managing user account creation, modification, and deletion.
- Regularly back up user account data to prevent data loss.
Tips
- Utilize Built-in Groups: Leverage the built-in groups like Administrators, Users, and Guests to simplify permission management.
- Create Custom Groups: Tailor custom groups based on specific needs to enhance organization and control.
- Review User Permissions: Regularly review user permissions to ensure they are still appropriate and necessary.
- Use Group Policies: For larger networks, consider using Group Policies to manage user accounts and permissions centrally.
- Implement Strong Password Policies: Enforce strong password requirements, including minimum length, complexity, and regular changes.
Conclusion
Managing local users and groups in Windows 11 is a fundamental aspect of system administration, ensuring security, efficiency, and compliance. By understanding the concepts, tools, and best practices outlined in this guide, you can effectively manage user accounts and permissions, creating a secure and well-organized computing environment. Regular review and maintenance of user accounts and groups are essential to maintain system integrity and prevent potential security vulnerabilities.


Closure
Thus, we hope this article has provided valuable insights into Managing Local Users and Groups in Windows 11: A Comprehensive Guide. We thank you for taking the time to read this article. See you in our next article!