Creating a Bootable USB Drive for Windows 11 Installation: A Comprehensive Guide
Related Articles: Creating a Bootable USB Drive for Windows 11 Installation: A Comprehensive Guide
Introduction
In this auspicious occasion, we are delighted to delve into the intriguing topic related to Creating a Bootable USB Drive for Windows 11 Installation: A Comprehensive Guide. Let’s weave interesting information and offer fresh perspectives to the readers.
Table of Content
Creating a Bootable USB Drive for Windows 11 Installation: A Comprehensive Guide
The process of creating a bootable USB drive for installing Windows 11 from an ISO file is a fundamental step in various scenarios. Whether you are upgrading an existing system, performing a clean installation, or setting up a new computer, a bootable USB drive serves as the primary medium for initiating the installation process. This guide will provide a detailed walkthrough, outlining the necessary steps and considerations, ensuring a smooth and successful installation.
Understanding the Essentials
Before embarking on the process, it is crucial to understand the fundamental concepts involved:
- ISO File: The ISO file is a digital representation of a Windows 11 installation disc. It contains all the necessary files and programs required for the operating system installation.
- Bootable USB Drive: A bootable USB drive is a formatted USB flash drive that can be used to boot a computer. The installation files are copied onto the USB drive, allowing the computer to initiate the Windows 11 installation process.
Prerequisites
To create a bootable USB drive for Windows 11, ensure the following prerequisites are met:
- Windows 11 ISO File: Download the official Windows 11 ISO file from Microsoft’s website.
- USB Flash Drive: A USB flash drive with at least 8GB of storage space. The drive will be formatted during the process, so ensure it contains no critical data.
- USB Drive Formatting Tool: A reliable USB drive formatting tool, such as Rufus, BalenaEtcher, or the built-in Windows Disk Management tool.
- Computer with Internet Access: To download the Windows 11 ISO file and for potential troubleshooting.
Step-by-Step Guide: Creating the Bootable USB Drive
1. Download the Windows 11 ISO File:
- Visit the official Microsoft website and locate the Windows 11 download page.
- Select the desired edition of Windows 11 (Home, Pro, etc.) and download the ISO file.
2. Format the USB Drive:
-
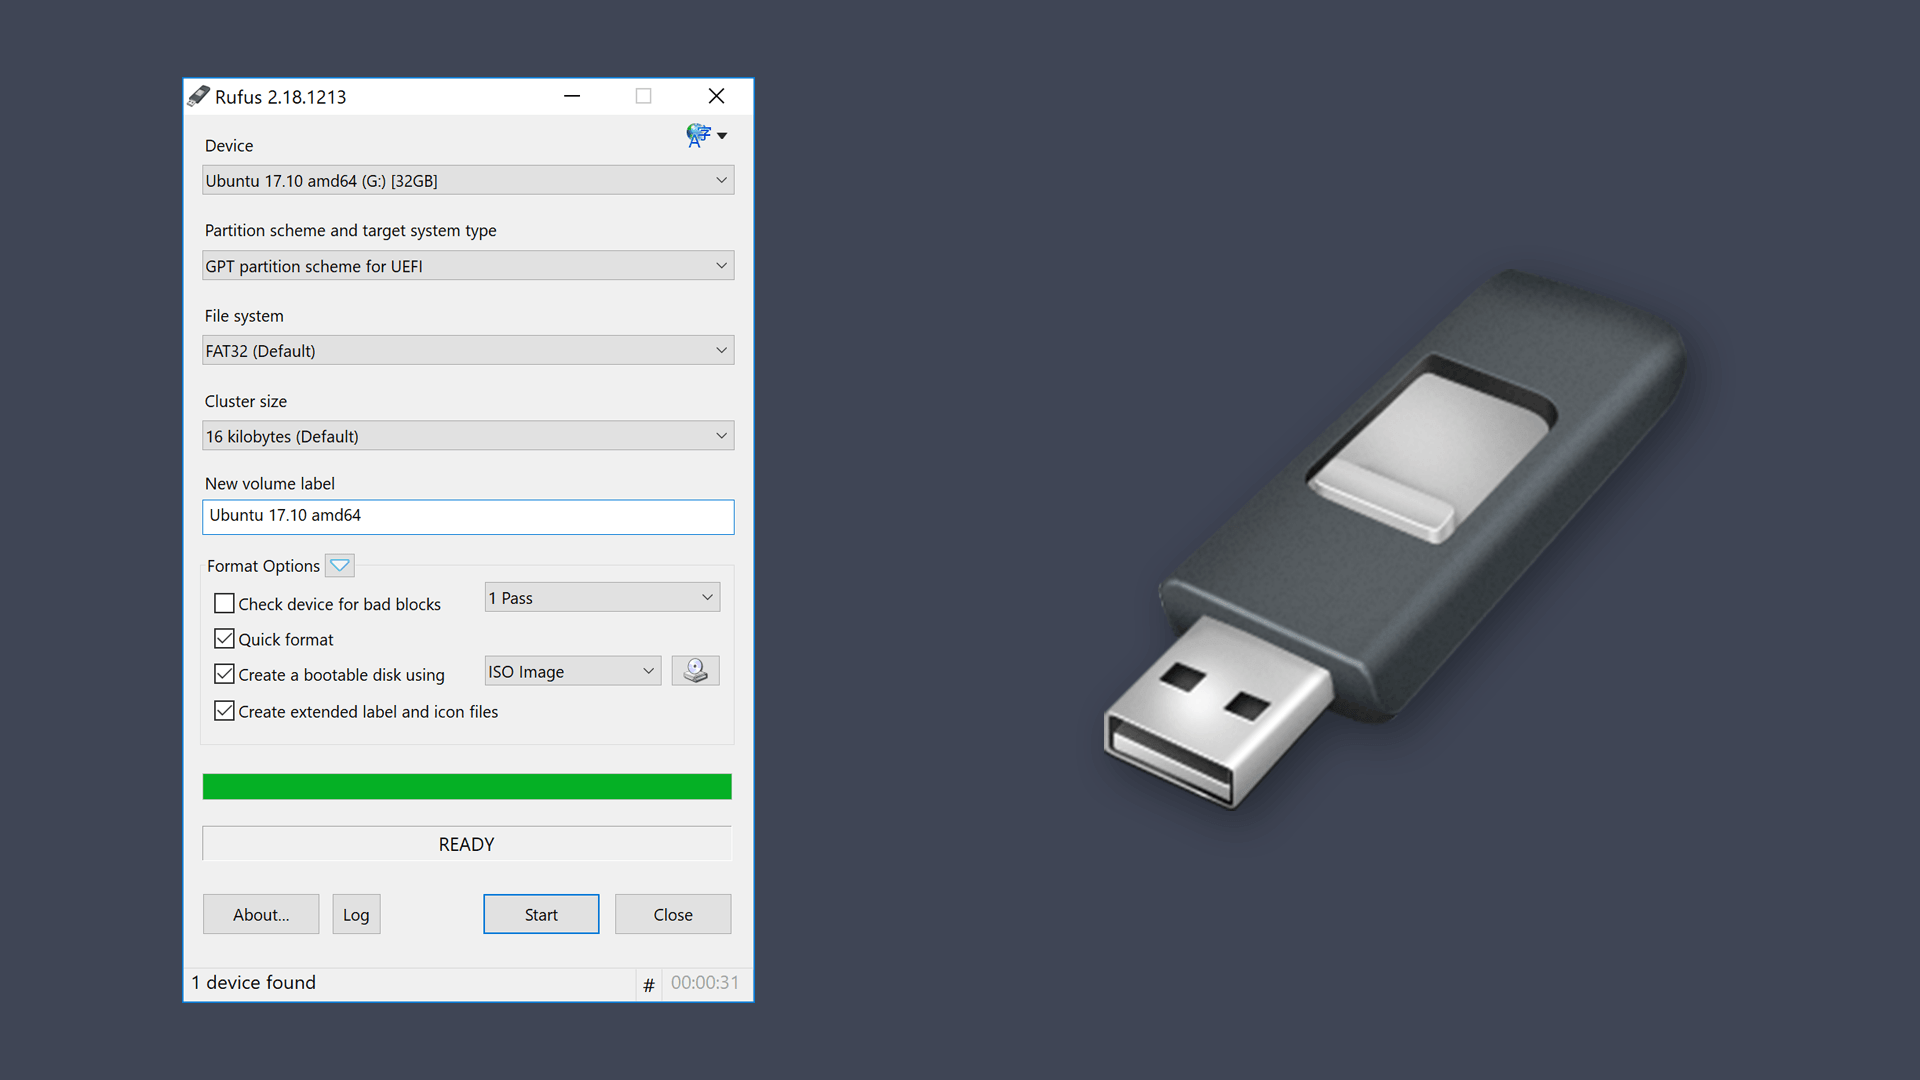
Using Rufus:
- Download and install Rufus on your computer.
- Launch Rufus and select the USB flash drive from the device list.
- Under "Boot Selection," choose "ISO Image."
- Click the "SELECT" button and locate the downloaded Windows 11 ISO file.
- Ensure the "Create a bootable disk using" option is set to "Windows 11 (64-bit)."
- Click the "START" button to begin formatting the USB drive.
-
Using BalenaEtcher:
- Download and install BalenaEtcher on your computer.
- Launch BalenaEtcher and select the downloaded Windows 11 ISO file.
- Select the USB flash drive from the device list.
- Click the "Flash!" button to begin formatting the USB drive.
-
Using Windows Disk Management:
- Open "Disk Management" by searching for it in the Windows search bar.
- Right-click on the USB flash drive and select "Format."
- Choose the "NTFS" file system and assign a suitable volume label.
- Check the "Quick Format" option and click "Start."
3. Copy the Installation Files:
- Once the USB drive is formatted, the installation files will be copied automatically by Rufus or BalenaEtcher.
- If using Windows Disk Management, manually copy the entire contents of the downloaded ISO file to the formatted USB drive.
4. Verify Bootability:
- After the process is complete, eject the USB drive safely.
- Restart your computer and access the BIOS settings by pressing the appropriate key (usually F2, F10, or Del) during boot-up.
- In the BIOS settings, navigate to the "Boot" section and select the USB drive as the primary boot device.
- Save the changes and exit the BIOS.
- The computer should boot from the USB drive and display the Windows 11 installation screen.
5. Installation Process:
- Follow the on-screen instructions to install Windows 11.
- Choose the desired language, keyboard layout, and other preferences.
- Accept the license agreement and proceed with the installation.
- During the installation process, you may need to partition the hard drive and choose where to install Windows 11.
- Once the installation is complete, restart your computer.
Important Considerations
- Data Backup: Before starting the installation, ensure you back up all important data on your computer. The installation process will erase the entire hard drive.
- Compatibility: Verify that your computer meets the minimum system requirements for Windows 11.
- Product Key: You will need a valid Windows 11 product key to activate the operating system.
- Drivers: After the installation, you may need to install device drivers for your computer’s hardware components.
FAQs
Q: Can I create a bootable USB drive for Windows 11 on a Mac computer?
A: Yes, you can create a bootable USB drive for Windows 11 on a Mac computer using tools like Rufus or BalenaEtcher.
Q: What if the USB drive is not recognized by the computer?
A: Ensure the USB drive is properly connected to the computer. Try a different USB port or try a different USB drive.
Q: Can I use a smaller USB drive?
A: While 8GB is the recommended minimum, you can use a smaller USB drive, but it may not have enough space for all the installation files.
Q: How do I boot from the USB drive?
A: During the boot-up process, press the appropriate key (usually F2, F10, or Del) to access the BIOS settings. In the BIOS, navigate to the "Boot" section and select the USB drive as the primary boot device.
Q: What if the installation fails?
A: If the installation fails, try re-creating the bootable USB drive or restarting the installation process. Consult Microsoft’s support website for further assistance.
Tips
- Use a high-quality USB drive: Choose a reputable brand and a USB drive with good read/write speeds for optimal performance.
- Verify the ISO file: Download the ISO file from a trusted source, such as Microsoft’s website.
- Check for errors: After creating the bootable USB drive, verify the installation files for any errors.
- Keep the USB drive clean: Avoid touching the contacts on the USB drive and store it in a dust-free environment.
Conclusion
Creating a bootable USB drive for Windows 11 installation is a straightforward process that allows for a clean and efficient installation. By following the steps outlined in this guide and adhering to the essential considerations, you can successfully create a bootable USB drive and proceed with installing Windows 11. Remember to back up your data, verify system compatibility, and consult the relevant resources for any troubleshooting needs.
![How to Make Windows 11 Bootable USB Drive [Step-by-Step Guide] - MiniTool Partition Wizard](https://www.partitionwizard.com/images/uploads/2021/07/windows-11-bootable-usb-drive-thumbnail.jpg)


Closure
Thus, we hope this article has provided valuable insights into Creating a Bootable USB Drive for Windows 11 Installation: A Comprehensive Guide. We thank you for taking the time to read this article. See you in our next article!