Compressing Data in Windows 10: A Guide to Creating ZIP Files
Related Articles: Compressing Data in Windows 10: A Guide to Creating ZIP Files
Introduction
In this auspicious occasion, we are delighted to delve into the intriguing topic related to Compressing Data in Windows 10: A Guide to Creating ZIP Files. Let’s weave interesting information and offer fresh perspectives to the readers.
Table of Content
Compressing Data in Windows 10: A Guide to Creating ZIP Files
In the digital age, data is constantly being created and shared. From documents and presentations to images and videos, managing large files can become a cumbersome task. Fortunately, Windows 10 offers a built-in solution for efficient data compression: ZIP files.
ZIP files are a common format for compressing multiple files and folders into a single, smaller archive. This process, known as "zipping," reduces file size, making it easier to store, transmit, and share data.
Understanding the Benefits of ZIP Files
Creating ZIP files in Windows 10 offers several advantages:
- Reduced File Size: Compressing files significantly reduces their storage requirements, allowing you to store more data on your hard drive or external storage devices.
- Enhanced Data Transmission: Smaller files are faster to transfer over the internet or through email, saving time and bandwidth.
- Improved Organization: Combining multiple files and folders into a single ZIP file simplifies data organization and management.
- Enhanced Security: While not encryption, ZIP files can be password-protected, adding an extra layer of security to sensitive information.
Methods for Creating ZIP Files in Windows 10
Windows 10 provides multiple methods for creating ZIP files, catering to different user preferences and needs:
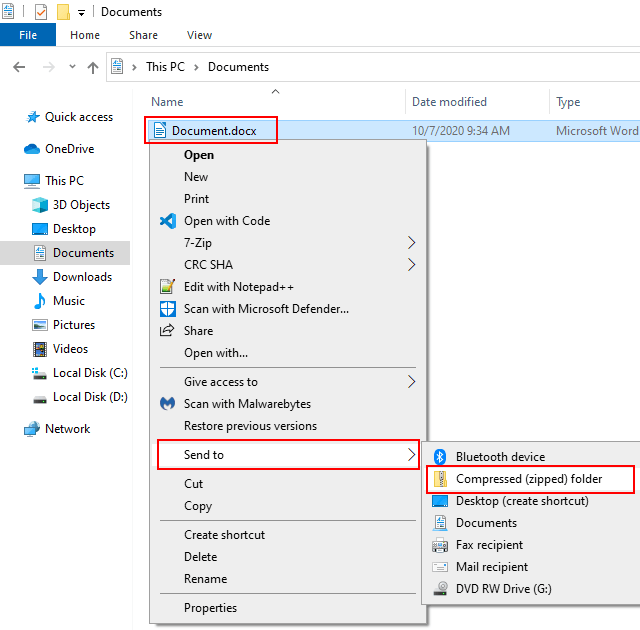
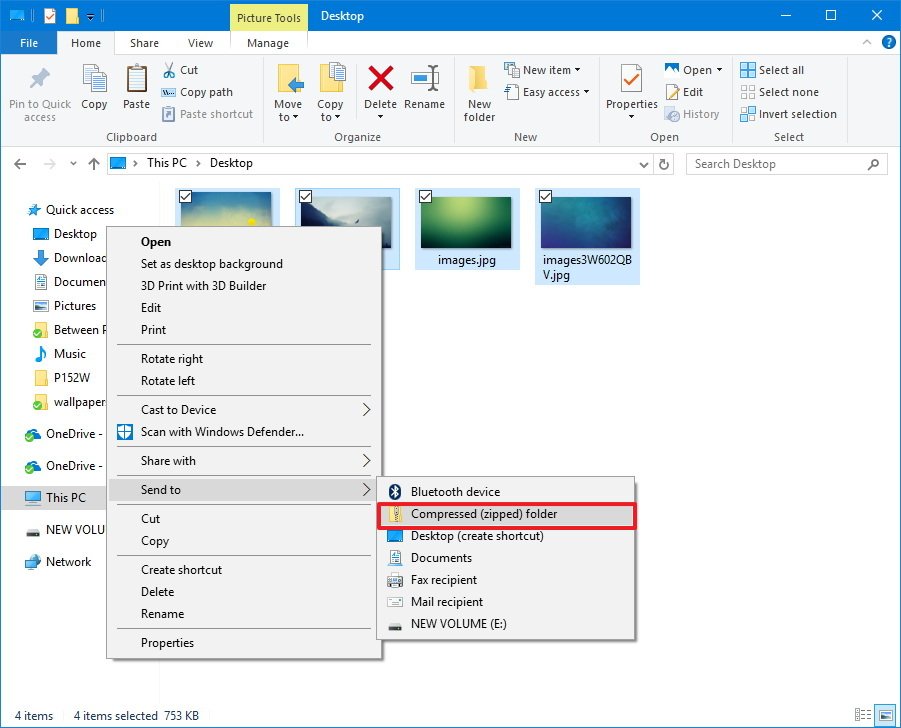
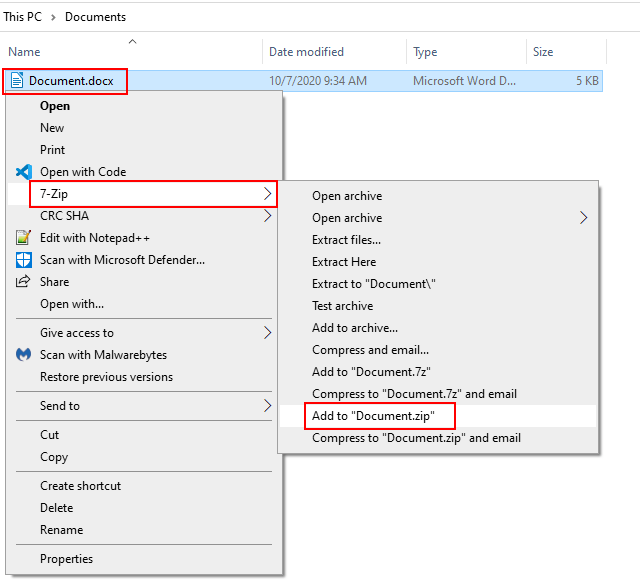
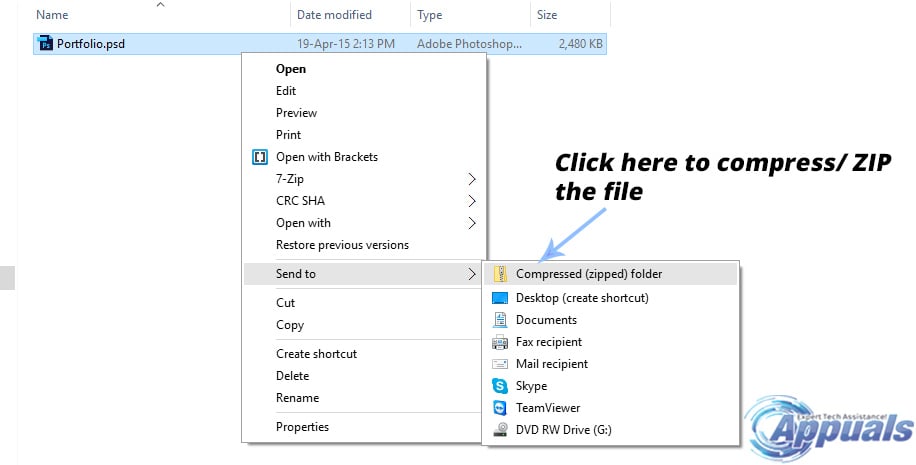
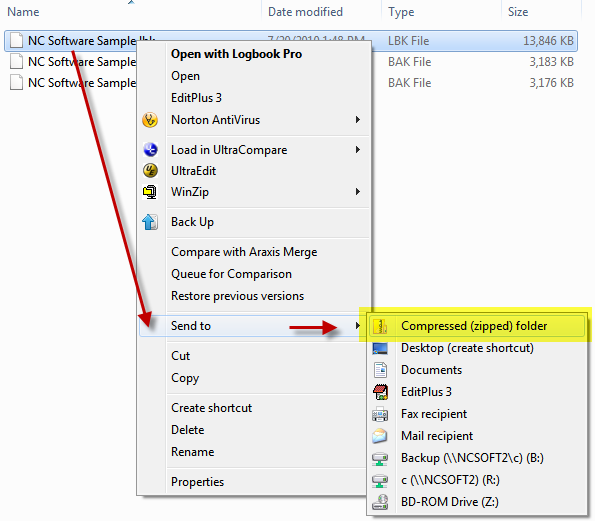
1. Using the File Explorer Context Menu:
This is the most straightforward method for creating ZIP files. Follow these steps:
- Select the files or folders: Navigate to the location of the files or folders you wish to compress in File Explorer.
- Right-click on the selected items: This will display a context menu.
- Choose "Add to archive": Select this option from the context menu.
-
Configure the archive settings: A dialog box will appear, allowing you to:
- Choose the archive name: Specify the name for your ZIP file.
- Select the archive format: While ZIP is the default option, you can also choose other formats like 7z or RAR if needed.
- Set compression level: Higher compression levels (e.g., "Best" or "Ultra") result in smaller file sizes but take longer to compress. Lower levels (e.g., "Fast" or "Normal") are faster but result in larger file sizes.
- Add a password: Protect your archive with a password for enhanced security.
- Click "OK": This will initiate the compression process, creating the ZIP file in the same location as the original files.
2. Using the Command Prompt:
For more advanced users, the Command Prompt offers greater flexibility and control over the compression process.
- Open the Command Prompt: Search for "cmd" in the Windows search bar and select "Command Prompt" from the results.
- Navigate to the desired directory: Use the "cd" command to change the current directory to the location containing the files you want to compress. For example, "cd C:UsersYourUsernameDocuments" navigates to the Documents folder.
-
Use the "zip" command: The "zip" command is used to create ZIP files. For instance, to compress all files in the current directory into a file named "archive.zip," use the following command:
zip archive.zip * -
Specify options: The "zip" command offers various options for customizing the compression process. For instance, you can add a password using the "-p" flag:
zip -p archive.zip * - Execute the command: Press Enter to execute the command, and the ZIP file will be created in the current directory.
3. Using Third-Party Compression Software:
While Windows 10 provides built-in compression tools, several third-party software options offer more advanced features and functionalities:
- 7-Zip: A popular and free open-source compression tool known for its high compression ratios and support for various archive formats.
- WinRAR: A widely used commercial compression tool offering a user-friendly interface, advanced compression algorithms, and support for multiple archive formats.
- PeaZip: A free and open-source compression utility that supports a wide range of archive formats, including ZIP, 7z, RAR, and more.
These third-party tools often provide additional features like file encryption, self-extracting archives, and more.
Extracting ZIP Files in Windows 10
Once a ZIP file is created, you can extract its contents using various methods:
- File Explorer: Right-click on the ZIP file, select "Extract All," and follow the on-screen instructions.
- Command Prompt: Use the "unzip" command followed by the ZIP file name.
- Third-Party Tools: Use software like 7-Zip, WinRAR, or PeaZip to extract the ZIP file contents.
FAQs about Creating ZIP Files in Windows 10:
-
Q: Can I compress individual files within a ZIP archive?
- A: Yes, you can add individual files or folders to an existing ZIP file by right-clicking on the ZIP file, selecting "Add," and then choosing the files you want to add.
-
Q: Can I create password-protected ZIP files?
- A: Yes, you can add a password to your ZIP files during the creation process using the built-in Windows tools or third-party software.
-
Q: What is the difference between ZIP and other archive formats like 7z or RAR?
- A: Each format uses different compression algorithms, leading to varying compression ratios and file sizes. 7z and RAR generally offer higher compression ratios than ZIP, but ZIP remains the most widely supported format.
-
Q: How do I know which compression level to choose?
- A: Choose a higher compression level for smaller file sizes, but be aware that it will take longer to compress. Opt for a lower compression level if you prioritize speed over file size reduction.
-
Q: Can I split a large ZIP file into multiple smaller files?
- A: Some third-party compression tools allow you to split large ZIP files into smaller, more manageable files.
Tips for Creating ZIP Files in Windows 10:
- Use a consistent naming convention: Naming ZIP files descriptively and consistently helps with organization and retrieval.
- Consider the compression level: Choose a compression level that balances file size reduction with compression time.
- Utilize password protection: Protect sensitive data with a password for enhanced security.
- Use third-party tools for advanced features: Explore third-party compression software for additional functionalities like file encryption, self-extracting archives, and more.
- Back up your ZIP files: Create backups of important ZIP files to ensure data recovery in case of accidental deletion or hardware failure.
Conclusion
Creating ZIP files in Windows 10 is a valuable skill for efficient data management, storage, and sharing. By utilizing the built-in tools or exploring third-party options, users can compress files, reduce storage requirements, enhance data transmission speed, and improve overall data organization. Understanding the benefits of ZIP files and utilizing them effectively can significantly streamline data handling processes in Windows 10.
Closure
Thus, we hope this article has provided valuable insights into Compressing Data in Windows 10: A Guide to Creating ZIP Files. We appreciate your attention to our article. See you in our next article!