Capturing Your Screen: Exploring the Recording Capabilities of Windows 11
Related Articles: Capturing Your Screen: Exploring the Recording Capabilities of Windows 11
Introduction
In this auspicious occasion, we are delighted to delve into the intriguing topic related to Capturing Your Screen: Exploring the Recording Capabilities of Windows 11. Let’s weave interesting information and offer fresh perspectives to the readers.
Table of Content
Capturing Your Screen: Exploring the Recording Capabilities of Windows 11
:max_bytes(150000):strip_icc()/Captureannotated-e128cac9ada949aba4a8322746ac1e0f.jpg)
In the digital age, the ability to record screen activity has become increasingly essential. Whether for creating tutorials, documenting software issues, capturing gameplay, or simply sharing a memorable moment, screen recording tools offer a powerful means of communication and documentation.
Windows 11, the latest iteration of Microsoft’s operating system, offers a built-in screen recording feature, empowering users to capture their desktop actions with ease. This built-in functionality provides a straightforward and accessible solution for various recording needs, eliminating the need for external applications.
Understanding the Built-in Screen Recorder
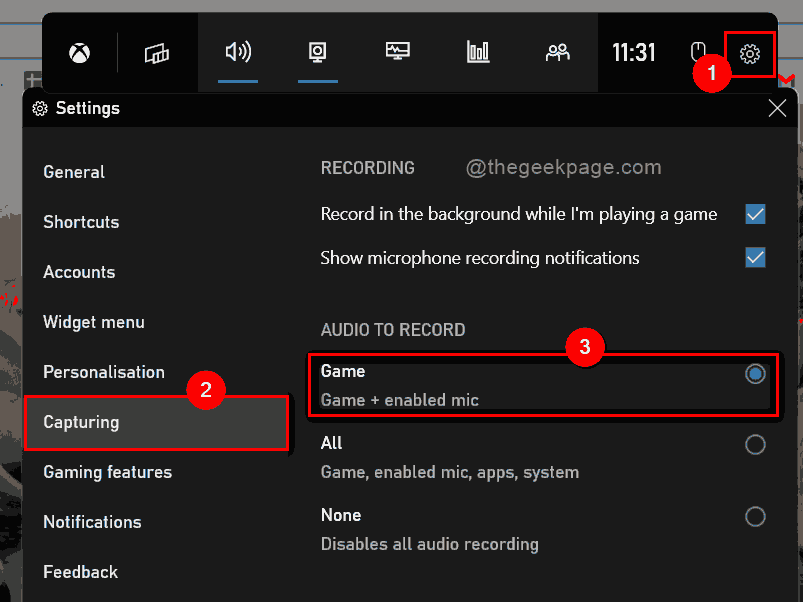
Windows 11’s screen recorder, known as "Xbox Game Bar," is accessible through a dedicated overlay that can be invoked with a simple keyboard shortcut (Windows key + G). This overlay offers a range of features, including:
- Screen Recording: The core functionality allows users to capture their screen activity, including audio from the system and microphone, directly within the Windows environment.
- Performance Monitoring: The Game Bar displays real-time system metrics such as CPU usage, GPU load, and frame rate, providing insights into system performance during recording sessions.
- Capture Screenshots: Users can capture still images of their screen, providing a quick and easy way to document specific moments or details.
- Broadcast Functionality: The Game Bar enables users to stream their gameplay or desktop activity to platforms like Twitch or Facebook, extending the reach of their recordings.
Utilizing the Built-in Screen Recorder
Activating the screen recorder is a simple process:
- Invoke the Game Bar: Press the Windows key + G simultaneously.
- Access the Recording Tools: Within the Game Bar, locate the "Capture" button, typically represented by a circle with a dot in the center.
- Start Recording: Click the "Capture" button to initiate screen recording.
- Stop Recording: Click the "Capture" button again to end the recording session.
- Access Recordings: The recorded videos are saved in the "Captures" folder within the user’s "Videos" directory.
Beyond the Basics: Exploring Advanced Features
While the basic screen recording functionality is straightforward, the Game Bar offers additional features that enhance the recording experience:
- Audio Options: Users can select their preferred audio source, whether it’s the system audio, microphone input, or a combination of both.
- Recording Area Selection: The Game Bar allows users to select a specific area of the screen to record, focusing on specific windows or applications.
- Performance Overlays: During recording, users can choose to display performance metrics like CPU usage and frame rate on the screen, providing valuable insights into system performance.
- Hotkeys: Users can customize keyboard shortcuts for various Game Bar functions, including starting and stopping recordings, taking screenshots, and more.
Benefits of Using Windows 11’s Built-in Screen Recorder
The integration of a screen recorder within Windows 11 offers several advantages:
- Accessibility: The feature is readily available to all Windows 11 users, eliminating the need for additional software installations.
- Simplicity: The user interface is intuitive and easy to navigate, making it accessible to users of all skill levels.
- Efficiency: The built-in nature of the recorder ensures a seamless integration with the Windows environment, offering a streamlined recording experience.
- Resource Optimization: The Game Bar is designed to minimize system resource usage, ensuring smooth performance even during demanding recording sessions.
Limitations and Alternatives
While Windows 11’s built-in screen recorder provides a valuable tool, it is not without limitations. Some users may find the lack of advanced editing features or the inability to record system audio without microphone input to be shortcomings.
For users requiring more sophisticated recording capabilities, third-party screen recording applications offer a wider range of features, including:
- Advanced Editing Tools: These applications often provide comprehensive editing capabilities, enabling users to trim, split, and add effects to their recordings.
- Customizable Recording Options: Third-party tools often allow users to fine-tune recording settings, such as frame rate, video quality, and recording area.
- Additional Functionality: Some applications offer features beyond basic screen recording, such as webcam integration, annotation tools, and live streaming capabilities.
Frequently Asked Questions
Q: Can I record my entire desktop screen or just a specific window?
A: Yes, you can choose to record the entire screen or select a specific window or application.
Q: Can I record audio along with my screen activity?
A: Yes, you can record system audio, microphone input, or both.
Q: Where are my recorded videos saved?
A: The recorded videos are saved in the "Captures" folder within the user’s "Videos" directory.
Q: Can I adjust the video quality or frame rate?
A: The built-in screen recorder offers limited customization options for video quality and frame rate. Third-party applications provide more flexibility in this regard.
Q: Can I use the screen recorder to record gameplay?
A: Yes, the Game Bar is specifically designed for capturing gameplay, providing real-time performance monitoring and streaming capabilities.
Tips for Effective Screen Recording
- Optimize System Performance: Ensure your system is running smoothly with sufficient RAM and storage space for optimal recording quality.
- Minimize Distractions: Close unnecessary applications and notifications to avoid distractions during your recording sessions.
- Test Audio Levels: Adjust microphone and system audio levels before recording to ensure clear audio quality.
- Consider Third-Party Applications: If you require advanced features or customization options, explore third-party screen recording applications.
Conclusion
Windows 11’s built-in screen recorder offers a convenient and accessible solution for capturing desktop activity. The ease of use, integration with the Windows environment, and range of features make it a valuable tool for various purposes. While it may not cater to all user needs, its accessibility and simplicity make it a valuable addition to the Windows 11 experience. For users seeking more advanced functionalities or customization, exploring third-party screen recording applications may be a suitable alternative. Regardless of the chosen method, capturing screen activity provides a powerful means of communication, documentation, and entertainment in the digital world.


:max_bytes(150000):strip_icc()/Gamebarrecordannotated-7098dcd76fdc4ed689fd8c66ea94521b.jpg)


Closure
Thus, we hope this article has provided valuable insights into Capturing Your Screen: Exploring the Recording Capabilities of Windows 11. We thank you for taking the time to read this article. See you in our next article!